Advanced Malware Detection using Memory Forensics
Memory Forensics is the analysis of the memory image taken from the running computer.
In this article, we will learn how to use Memory Forensic Toolkits such as Volatility to
analyze the memory artifacts with practical real life forensics scenarios. Memory forensics
plays an important role in investigations and incident response.
It can help in extracting forensics artifacts from a computer’s memory like running process, network
connections, loaded modules etc. It can also help in unpacking, rootkit detection and reverse engineering.
Steps in memory Forensics
Below are the list of steps involved in memory forensics.
Memory Acquisition
This step involves dumping the memory of the target machine. On the physical machine you can use tools like Win32dd/Win64dd, Memoryze, DumpIt, FastDump. Whereas on the virtual machine, acquiring the memory image is easy, you can do it by suspending the VM and grabbing the “.vmem” file.
Memory Analysis
Once a memory image is acquired, the next step is to analyze the grabbed memory dump for forensic
artifacts, tools like Volatility and others like Memoryze can be used to analyze the memory.
Volatility quick overview
Volatility is an advanced memory forensic framework written in python. Once the memory image has been acquired Volatility framework can be used to perform memory forensics on the acquired memory image. Volatility can be installed on multiple operating systems (Windows, Linux, Mac OS X), Installation details of volatility can be found at
http://code.google.com/p/volatility/wiki/FullInstallation.
Volatility Syntax
• Using -h or --help option will display help options and list of a available plugins
Example: python vol.py -h
• Use -f <filename> and --profile to indicate the memory dump you are analyzing
Example: python vol.py -f mem.dmp --profile=WinXPSP3x86
• To know the --profile info use below command:
Example: python vol.py -f mem.dmp imageinfo
Demo
In order to understand memory forensics and the steps involved. Let’s look at a scenario, our analysis and flow will be based on the below scenario.
Demo Scenario
Your security device alerts on malicious http connection to the domain “web3inst.com” which resolves to 192.168.1.2, communication is detected from a source ip 192.168.1.100 (as shown in the below screenshot). you are asked to investigate and perform memory forensics on the machine 192.168.1.100.

Memory Acquisition
To start with, acquire the memory image from 192.168.1.100, using memory acquisition tools. For the sake of demo, the memory dump file is named as “infected.vmem”.
Analysis
Now that we have acquired “infected.vmem”, let’s start our analysis using Volatility advanced memory analysis framework
Step 1: Start with what you know
We know from the security device alert that the host was making an http connection to web3inst.com (192.168.1.2). So let’s look at the network connections.
Volatility’s connscan module, shows connection to the malicious ip made by process (with pid 888).

Step 2: Info about web3inst.com
Google search shows this domain(web3inst.com) is known to be associated with malware, probably
“Rustock or TDSS rootkit”. This indicates that source ip 192.168.1.100 could be infected by any of these malwares, we need to confirm that with further analysis.

Step 3: what is Pid 888?
Since the network connection to the ip 192.168.1.2 was made by pid 888, we need to determine which process is associated with pid 888. “psscan” shows pid 888 belongs to svchost.exe.

Step 4: YARA scan
Running the YARA scan on the memory dump for the string “web3inst” confirms that this domain
(web3inst.com) is present in the address space of svchost.exe (pid 888). This confirms that svchost.exe was making connections to the malicious domain “web3inst.com”.

Step 5: Suspicious mutex in svchost.exe
Now we know that svchost.exe process (pid 888) was making connections to the domain “web3inst.
com”, lets focus on this process. Checking for the mutex created by svchost.exe shows a suspicious mutex “TdlStartMutex”.

Step 6: Info about the mutex
Google search shows that this suspicious mutex is associated with TDSS rootkit. This indicates that the mutex “TdlStartMutex” is malicious.

Step 7: File handles of svchost.exe
Examining file handles in svchost.exe (pid 888) shows handles to two suspicious files (DLL and driver file).As you can see in the below screenshot both these files start with “TDSS”.


Step 8: Detecting Hidden DLL
Volatility’s dlllist module couldn’t find the DLL starting with “TDSS” whereas ldrmodules plugin was able to find it. This confirms that the DLL (TDSSoiqh.dll) was hidden. malware hides the DLL by unlinking from the 3 PEB lists (operating sytem keeps track of the DLL’s in these lists).

Step 9: Dumping the hidden DLL
In the previous step hidden DLL was detected. This hidden DLL can be dumped from the memory to disk using Volatility’s dlldump module as shown below.

Step 10: VirusTotal submission of dumped DLL
Submitting the dumped dll to VirusTotal confirms that it is malicious.

Step 11: Looking for other malicious DLL’s
Looking for the modules in all the processes that start with “TDSS” shows that msiexec.exe process
(pid 1236) has reference to a temp file (which is starting with TDSS) which is suspicous.

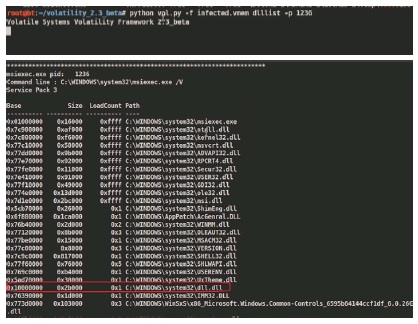
Step 12: Suspicious DLL loaded by msiexec
Examining the DLL’s loaded by the process msiexec (pid 1236) using dlllist module, shows a suspicious dll (dll.dll) loaded by msiexec process.
Step 13: Dumping DLL and VT submission
Dumping the suspicious DLL (dll.dll) and submitting to VirusTotal confirms that this is associated
with TDSS (Alueron) rootkit.

Step 14: Hidden Kernel driver
In step 7 we also saw reference to a driver file (starting with “TDSS”). Searching for the driver file using Volatility’s modules plugin couldn’t find the driver that starts with “TDSS” whereas Volatility’s driverscan plugin was able to find it. This confirms that the kernel driver (TDSSserv.sys) was hidden. The below screenshot also shows that the base address of the driver is 0xb838b000 and the size is 0x11000.

Step 15: Kernel Callbacks
Examining the callbacks shows the callback (at address starting with 0xb38) set by an unknown driver.


Step 16: Examining the unknown kernel driver
The below screenshot shows that this unknown driver falls under the address range of TDSSserv.sys.
This confirms that unknown driver is “TDSSserv.sys”.

Step 17: Kernel api hooks
Malware hooks the Kernel API and the hook address falls under the address range of TDSSserv.sys
(as shown in the below screenshots).


Step 18: Dumping the kernel driver
Dumping the kernel driver and submitting it to VirusTotal confirms that it is TDSS (Alureon) rootkit.

Conclusion
Memory forensics is a powerful technique and with a tool like Volatility it is possible to find and extract the forensic artifacts from the memory which helps in incident response, malware analysis and reverse engineering. As you saw, starting with little information we were able to detect the advanced malware and its components.
Memory Forensics is the analysis of the memory image taken from the running computer.
In this article, we will learn how to use Memory Forensic Toolkits such as Volatility to
analyze the memory artifacts with practical real life forensics scenarios. Memory forensics
plays an important role in investigations and incident response.
It can help in extracting forensics artifacts from a computer’s memory like running process, network
connections, loaded modules etc. It can also help in unpacking, rootkit detection and reverse engineering.
Steps in memory Forensics
Below are the list of steps involved in memory forensics.
Memory Acquisition
This step involves dumping the memory of the target machine. On the physical machine you can use tools like Win32dd/Win64dd, Memoryze, DumpIt, FastDump. Whereas on the virtual machine, acquiring the memory image is easy, you can do it by suspending the VM and grabbing the “.vmem” file.
Memory Analysis
Once a memory image is acquired, the next step is to analyze the grabbed memory dump for forensic
artifacts, tools like Volatility and others like Memoryze can be used to analyze the memory.
Volatility quick overview
Volatility is an advanced memory forensic framework written in python. Once the memory image has been acquired Volatility framework can be used to perform memory forensics on the acquired memory image. Volatility can be installed on multiple operating systems (Windows, Linux, Mac OS X), Installation details of volatility can be found at
http://code.google.com/p/volatility/wiki/FullInstallation.
Volatility Syntax
• Using -h or --help option will display help options and list of a available plugins
Example: python vol.py -h
• Use -f <filename> and --profile to indicate the memory dump you are analyzing
Example: python vol.py -f mem.dmp --profile=WinXPSP3x86
• To know the --profile info use below command:
Example: python vol.py -f mem.dmp imageinfo
Demo
In order to understand memory forensics and the steps involved. Let’s look at a scenario, our analysis and flow will be based on the below scenario.
Demo Scenario
Your security device alerts on malicious http connection to the domain “web3inst.com” which resolves to 192.168.1.2, communication is detected from a source ip 192.168.1.100 (as shown in the below screenshot). you are asked to investigate and perform memory forensics on the machine 192.168.1.100.
Memory Acquisition
To start with, acquire the memory image from 192.168.1.100, using memory acquisition tools. For the sake of demo, the memory dump file is named as “infected.vmem”.
Analysis
Now that we have acquired “infected.vmem”, let’s start our analysis using Volatility advanced memory analysis framework
Step 1: Start with what you know
We know from the security device alert that the host was making an http connection to web3inst.com (192.168.1.2). So let’s look at the network connections.
Volatility’s connscan module, shows connection to the malicious ip made by process (with pid 888).
Step 2: Info about web3inst.com
Google search shows this domain(web3inst.com) is known to be associated with malware, probably
“Rustock or TDSS rootkit”. This indicates that source ip 192.168.1.100 could be infected by any of these malwares, we need to confirm that with further analysis.
Step 3: what is Pid 888?
Since the network connection to the ip 192.168.1.2 was made by pid 888, we need to determine which process is associated with pid 888. “psscan” shows pid 888 belongs to svchost.exe.
Step 4: YARA scan
Running the YARA scan on the memory dump for the string “web3inst” confirms that this domain
(web3inst.com) is present in the address space of svchost.exe (pid 888). This confirms that svchost.exe was making connections to the malicious domain “web3inst.com”.
Step 5: Suspicious mutex in svchost.exe
Now we know that svchost.exe process (pid 888) was making connections to the domain “web3inst.
com”, lets focus on this process. Checking for the mutex created by svchost.exe shows a suspicious mutex “TdlStartMutex”.
Step 6: Info about the mutex
Google search shows that this suspicious mutex is associated with TDSS rootkit. This indicates that the mutex “TdlStartMutex” is malicious.
Step 7: File handles of svchost.exe
Examining file handles in svchost.exe (pid 888) shows handles to two suspicious files (DLL and driver file).As you can see in the below screenshot both these files start with “TDSS”.
Step 8: Detecting Hidden DLL
Volatility’s dlllist module couldn’t find the DLL starting with “TDSS” whereas ldrmodules plugin was able to find it. This confirms that the DLL (TDSSoiqh.dll) was hidden. malware hides the DLL by unlinking from the 3 PEB lists (operating sytem keeps track of the DLL’s in these lists).
Step 9: Dumping the hidden DLL
In the previous step hidden DLL was detected. This hidden DLL can be dumped from the memory to disk using Volatility’s dlldump module as shown below.
Step 10: VirusTotal submission of dumped DLL
Submitting the dumped dll to VirusTotal confirms that it is malicious.
Step 11: Looking for other malicious DLL’s
Looking for the modules in all the processes that start with “TDSS” shows that msiexec.exe process
(pid 1236) has reference to a temp file (which is starting with TDSS) which is suspicous.
Step 12: Suspicious DLL loaded by msiexec
Examining the DLL’s loaded by the process msiexec (pid 1236) using dlllist module, shows a suspicious dll (dll.dll) loaded by msiexec process.
Step 13: Dumping DLL and VT submission
Dumping the suspicious DLL (dll.dll) and submitting to VirusTotal confirms that this is associated
with TDSS (Alueron) rootkit.
Step 14: Hidden Kernel driver
In step 7 we also saw reference to a driver file (starting with “TDSS”). Searching for the driver file using Volatility’s modules plugin couldn’t find the driver that starts with “TDSS” whereas Volatility’s driverscan plugin was able to find it. This confirms that the kernel driver (TDSSserv.sys) was hidden. The below screenshot also shows that the base address of the driver is 0xb838b000 and the size is 0x11000.
Step 15: Kernel Callbacks
Examining the callbacks shows the callback (at address starting with 0xb38) set by an unknown driver.
Step 16: Examining the unknown kernel driver
The below screenshot shows that this unknown driver falls under the address range of TDSSserv.sys.
This confirms that unknown driver is “TDSSserv.sys”.
Step 17: Kernel api hooks
Malware hooks the Kernel API and the hook address falls under the address range of TDSSserv.sys
(as shown in the below screenshots).
Step 18: Dumping the kernel driver
Dumping the kernel driver and submitting it to VirusTotal confirms that it is TDSS (Alureon) rootkit.
Conclusion
Memory forensics is a powerful technique and with a tool like Volatility it is possible to find and extract the forensic artifacts from the memory which helps in incident response, malware analysis and reverse engineering. As you saw, starting with little information we were able to detect the advanced malware and its components.