What You should know Best for Advancing Your Hacking Skills
Tutorial 1 – Required Infrastructure
Welcome to the last module of this workshop. We have been discussing exploit development and more about tools and techniques, however, we haven’t gone through details where a beginner can setup the required virtual environment in order to complete this workshop with hands-on experience and where a newbie can learn more in their home environment.
If you are a newbie here and don’t have much experience with the following topics then they should stand as a prerequisite for you to start gaining expertise in exploit development and security research field.
● Metasploit Framework (mandatory)
● Kali Linux (not mandatory)
● Mona.py (mandatory)
● Assembly Language (mandatory)
● Basic TCP/IP Concepts
● Linux experience
Moreover you should be good enough in Windows in and outs, how to fix problems and know what happens in the background of applications and programs, which are used in exploit development.
For our newbies we are presenting how to setup a home environment for this workshop and if you have prior experience in assembly and how to setup home lab for ethical hacking or penetration testing work then this might not be mandatory for you to go through. However, considering all types of audiences from beginners we feel it’s worthwhile to cover this in one workshop so that you don’t need to worry and hit Google again and again.
The Home Lab
At the very beginning you need a virtualization tool that can help you build the Home Lab, it is recommended to use Virtual Box as it’s free and a good start for students and home users.
Download Link: https://www.virtualbox.org/wiki/Downloads
Select & download the binary, as per your operating system requirement, in my case I will be installing the VirtualBox-4.3.12-93733-OSX from the above download link as shown below.

Double click the icon as shown in above figure.

Continue to install by clicking the continue button.

Begin installation by clicking the continue button.

Select the installation location or customize the installation as shown above,however it is recommended to leave the settings as default and hit installation.

Successful installation will show the below screen.

Virtual box installation is now complete.
Virtual Machines Setup, Windows XP
Our next step is setting up the Windows XP as a virtual machine so that you can install vulnerable applications and start testing.
Now, run the Virtual Box by simply clicking its icon from Applications and you will see it run quickly as shown below.

Click the new button on top left corner to setup new machine, type the name and select type of operating system and select the operating system version to install. Configure this as shown in below figure. Once this is complete you will be prompted to select the memory for this virtual machine.

Configure the memory size, as you are installing Windows XP hence you do not need to waste your memory, for Windows XP 512MB of RAM size would be enough.

Configure Storage
Next step is to configure the hard drive, for Windows XP 10GB space would be enough and recommended.

Select the hard drive type as VID (Virtual Box Disk Image) and continue.

Allocate the space dynamically to save your MAC machine.

Configure the size and name of the virtual hard disk you have just configured and create the disk as shown below.

Your new virtual machine is now complete, once you create the hard disk it will complete the setup of virtual machine and you will see the below outcome as shown in the figure.

Windows XP Installation is easy; you just need to attach the Image to the virtual CD drive, most of you have already gone through this phase many times but for newbies we have presented below.

In the storage Tree section select Empty CDROM as shown above and you will see the following option, click the CDROM button at the top right section as shown below to chose the Windows XP ISO image.

Once configured successfully you will be good to install the Windows XP operating system into this Virtual Machine.


Now run the machine, sit back and install the Windows XP Operating System as you install it on the actual hardware as shown below. Once this installation is completed we will install the Vulnerable Application in Windows XP.

Without hiccups this would lead to successful installation of Windows XP operating system. However you need to ensure that your Network Card type is set as shown below in order to connect your Virtual Machine with your host operating system.

Network Card type should be set to PCnet-FAST III type as shown in the below configuration.

Download the following applications for installing in this Windows XP so that you can have vulnerable applications ready for your security research development. You can load this lab with all kind of vulnerabilities and other stuff you want but as a minimum we recommend the following applications for practicing.
PCManFTPD
http://www.exploit-db.com/exploits/27007/
http://www.exploit-db.com/exploits/27703/
Ability FTP Server
http://www.exploit-db.com/exploits/588/
http://www.exploit-db.com/exploits/618/
EasyFTP Server
http://www.exploit-db.com/exploits/14402/
Download and install these applications one by one or install all together and change the port number so that you can run them parallel and practice altogether.
Immunity Debugger
Now, get the Immunity Debugger and install it so that you can debug these applications as explained in this workshop in previous modules.
Since your XP installation is a fresh install, python is not available, hence Immunity Installation will prompt you to install Python at first.

Accept the license agreement, and click next to continue the installation setup.

Accept the license agreement, and click next to continue the installation setup.
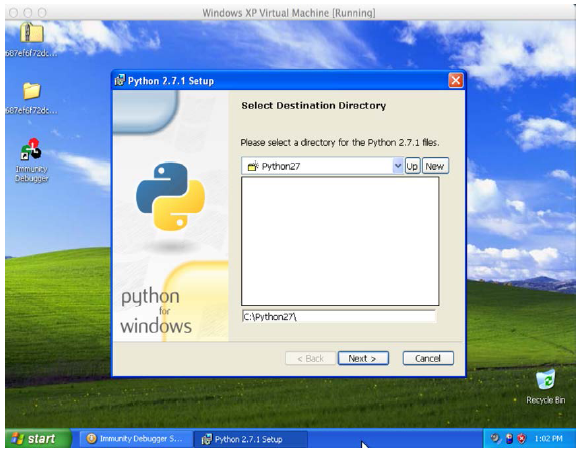
Leave the destination directory with the provided default settings and continue with your installation.

Done, you are now finished with the installation of Immunity Debugger, click the icon on your desktop to run the Immunity first time.

The Lovely “Mona.py”
We are finished with Immunity Debugger installation, now its time to plugin this debugger with Mona.py plugin that we explained in previous module. You can download this plugin from below link. Once download is finished, simply place this Mona.py plugin file into the Immunity Installation folder and then Py Commands directory as shown below.
Mona.py download link:
http://redmine.corelan.be/projects/mona/repository/changes/mona.py?rev= master

To ensure Mona.py is working, simply run Immunity Debugger and run the [!mona] command as shown in the following figure. To run the command, type the command to run in the bottom text box and hit enter.
That’s all, however you might be thinking that we haven’t covered Metasploit Framework installation and how to get it ready! You can make it easily, download the Kali Linux copy and install the Virtual Machine as we did for XP. If any one has any issue in doing that please post on forum and we will help.
Basic Concepts
We have been talking about registers and assembly. Its worthwhile to present something here, which gives you a background of what they are and why they are important to understand.
Registers
In the field of exploit development key registers are basically Pointer registers called EIP, ESP and EBP registers where “E” stands for extended.
Instruction Pointer stores the offset address of the next instruction to be executed and this is your EIP.
Base Pointer helps in referencing the parameter variables passed to a subroutine and this is your EBP.
And then you have a stack pointer, which is basically a data structure, in which you can push and pop data into and from it, respectively. Unlike a FIFO (first in, first out) however, the popped data from a stack are the elements that you pushed last. Because of this, a stack is also termed LIFO (last in, first out) or FILO (first in, last out). This is your ESP.
To gain in depth knowledge and more understanding on stack and how you can smash it, we recommend you go through the Smash The Stack article available on http://insecure.org/stf/smashstack.html