Security Testing of Internetworking Operating
System
Tutorial 1 –
The Home Lab
Welcome to the second module of the “Attacking Network Devices”
workshop. You have learned the basic principles in the previous module.
Hands-on experience is a must for a security professional who wants to
gain experience in network security testing. But the problem is, how can
you achieve this goal?
This module will explain how you can build your own virtual lab that will
be running switches and routers virtually with real Internetworking
Operating System. Once you are able to setup this lab, you can gain more
experience with the Internetworking Operating System as well as testing
the security of network devices.
Here, we will again clarify one thing, network devices as explained earlier
in the workshop are considered any type of device that can have an IP
Address or simply a device that can come and join the network.
For keeping your hacking taste sour and juicy we will try to add as many
as network devices as we can and include different types of operating
systems so that we can play more in our lab.
Secondly, if you already have experience in network devices like
administration and management, you might already be aware of how to
setup this lab. But it’s not necessary that all of our students know this, so
if you already know how to do this, you can easily skip this section.
So let’s start. Now, to run these network devices, like switches or routers,
you have to definitely have virtual machine software that can run these
devices virtually, but on top of this, you need an emulator as well that can
emulate the network operating system. GNS3 is the top in the list and
there is no other software that can emulate Internetworking Operating
Systems the way GNS3 can do it for you.
Let’s download this software from the below link, of course you have to go
through registration steps and then you can download from below link.
Vendor Link: http://www.gns3.com/
Extensive documentation is available on the vendor site so we will not
dump that here. It is recommended to use that for getting used to
working with this emulator, however, we will take the board from setting
up the lab and basic network configuration plus which tools you can use
and how you can use them for security testing of your network devices.
Recommended lab setup
Your virtual home lab on GNS3 should be running the following type of
network devices as a minimum so that you have enough systems to play
with. However, you need to have good hardware to achieve this goal.
Secondly, the workshop will be focused mainly on Internetworking
Operating Systems, however, to add a different flavor we will quickly look
at other operating systems as well.
● Cisco Switches
● Cisco Routers
● Kali Linux
● Microsoft Windows
Now, to setup Linux and Microsoft you have to install Virtual Box and then
create separate virtual machines accordingly. Once you have running VMs
for Linux and Microsoft Operating Systems, you can integrate those into
GNS3 too.
For emulating CISCO Internetworking Operating System, you need the
images just like you need OS images for Microsoft and Linux to setup
Virtual Machines in Virtual Box.
The workshop is built on Mac OS so we have an installed version of GNS3
for Mac OS and are also running Virtual Box for Mac.

Run the GNS3 as save a new project with preferred name. We have setup
a number of Cisco IOS for different devices along with Windows XP and
Kali Linux Hosts to build our virtual home lab within GNS3.
You should first get VMs up and running for other operating systems and
then you can import those Machines in GNS3. To learn more about GNS3
please visit vendor website. If you can not make it, post on the forum and
we will help you with GNS3 Home Labs setup in detail which can be
utilized for hands-on hacking routers / switches / firewalls / Intrusion
Prevention Systems, as well.
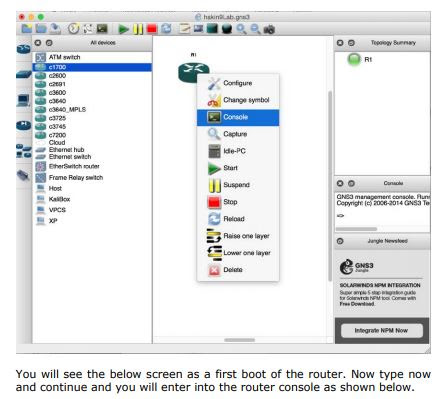
Now, we will add routers and switches first so that we can first boot in and
show you the IOS consoles.


Now do some initial configuration by setting up a IP Address to this and
then we will integrate Kali Linux as we will use Kali Linux to attach this
network device. We have setup the router with this initial configuration
and the IP Address of the router is shown in below snapshot.

Now, you have to connect this router with a switch and add a Kali Linux
Host so that you can build the home network virtually within GNS3. To
equip this virtual lab for the workshop, we will be running more routers
and hosts in the final network diagram as shown below.
The final Lab diagram can look like the below as shown in the snapshot,
however, you are free to add as many devices as you need, depending on
your hardware performance.

So what you have in the network is accessible by the normal user and a
Bad guy. Both have access to a switch and four routers running in the
network.

The above image shows four routers in the boot up process and you
should configure them on your own. (As we mentioned, if you need a fullblown workshop on this, please request on the forum). Now at this stage
what is up and running in the virtual lab is shown below and first you have
to find the IP Address of the routers quickly.

You can notice that four routers, a switch and Kali Linux have green links,
which means they are up and running, however, the XP Machine is on a
red link and this is obvious that it is down. We will turn it up if required.
Now, run the network discovery tool from Kali Linux and find out the
routers IP Addresses as shown below.
Exercise 1 – Discovering Network

Okay, so far three devices discovered how lab is running for routers and a
switch too. Let’s pick one IP Address and see which network devices is
running on this IP Address.

Okay, cool we now know that we have two open ports running on this
device, however, the type of device is not discovered by nmap tool. So
let’s run another scan and find out who is on this IP Address.

Cool, Cisco router running IOS is discovered by nmap, it is also running
telnet and http services which you can see as well in services discovered
by nmap. You can run the full scan on the network to discover all Cisco
devices and what is running on them as services so that you can further
run different attacks.
Now, let’s start the network attack phase. So far, we have a couple of
routers up and running in the lab. Let’s do some testing with the following
tools.
“This is to be noted that what is presented in this workshop are
the conceptual testing methods that demonstrate how you can
build a Cisco home lab virtually and practice different network
attacks to gain hands-on experience in network attacks. Moreover,
if you have more vulnerable Cisco IOS(s) installed on routers you
will gain more vulnerabilities to exploit in and practice IOS Attack
methods on Cisco Devices.”
Tools Required (Available in Kali Linux)
● Nmap
● Cisco Torch
● Network Discovery
● Cisco Global Exploiter
● SNMP Enumeration Tool
The best part is, all of these tools are available in Kali Linux, in fact you
can find more tools that can be used to attack network devices. We will
have walkthroughs using all of these tools in our next module. Please join
us and thank you for completing this module.
Note: If you want to learn Cisco IOS Exploit Development then
post on the forum and we will bring the workshop dedicated to the
exploit development on Cisco platform.