NEW HACKING ERA: WIRELESS HACKING BY DRONES
Drone Hack (Defensive)
The global market for commercial drones is projected to reach US$1.8 billion by 2020, driven by the expanding use of unmanned aerial vehicles (UAVs) in executing high-risk tasks and the growing prominence of drones-as-a-service (DaaS). Growing demand for superior aerial imagery, remote sensing, air surveillance, development of advanced sensors, improvements on computing speed, and enhanced data processing capabilities, are driving the use of UAVs in commercial applications. Technology maturity and falling prices of these systems are expanding market opportunities
into a wide range of commercial applications like:
● Precision agriculture
● Construction and Inspection
● Public safety and FRO (First Responder Operations)
● Mapping and Surveying
This is a guide on defense, specifically the Parrot Bebop Drone – once pulled out of the box, it has no encryption or authentication methods, thus it leaves the drone susceptible to wireless hacking. Remember, if the drone is updated then certain security functions may be changed.
In this guide, I will be disconnecting the original user from the drone. This can allow any other device to connect to the drone and control it. Additionally, I will be connecting to the drone through Kali Linux, and downloading video captured by the drone. Then, I will demonstrate how to upload files on top of drone files, before connecting over telnet and forcing the drone to shut down and drop from the sky.

FreeFlight Pro now enables you to fly Parrot Bebop drones, Parrot Bebop 2 and Parrot Disco
We need to execute these commands:


Us:

Now I have the drone control. At this point, I can proceed with the FTP procedure. These steps are to get network services backup, and are not required as long as you have not placed your card into monitor mode.


¹ These steps can be accomplished through Windows machines too.
Nothing with netdiscover.
 Now we are going to run a ping scan of devices 1-254. I am assuming only the subnet will change from person to person. However, copy whatever IP address you got and make sure the last octect is 1-254. This should list all devices connected to the drone. We are interested in the host ending in 1.

Now we run a scan on the target… and FTP is up! There is no more Telnet, there also seems to be a web page.

Let’s connect to the FTP server.


You can download them.

Alternatively, you could upload infected files, or download files, infect them and reload them to the drone. For the purposes of this article, I will only overwrite the first file and wait for a response.

Done, we now have a modified file and “probably” an infected file on the drone’s user.
Let us see how to hack a password protected drone. This is the network settings page for the drone, notice the simple password.

For added security, users should also change the network name of their devices to avoid targeted attacks. OK, let’s do it.


A drone is navigated to a line-of-sight with the infected computer. After the computer is located, malware exfiltrate data via HD LED signals until we get 100% of our information target.
Air-gapped networks are isolated, separated both logically and physically from public networks, for example, military,industrial and financial networks. Although the feasibility of invading such systems has been demonstrated in recent years, communication of data to/from air-gapped networks is a challenging task to attackers to perpetrate, an even more difficult threat to defend against.
New methods of communicating with air gapped networks are currently being exposed, some advanced and difficult to mitigate. These newfound vulnerabilities have wide reaching implications on what we considered to be a foolproof solution to network security – the placement of a physical air gap.
But it doesn’t stop there – new techniques of covertly getting information in and out of air gapped networks are being exposed. Thus it is important not only to publicize these vectors of attack, but their countermeasures and feasibility as well.
In this article, we will outline the steps an attacker must take in order to bridge an air gapped network. We will review the state-of-the-art techniques over thermal, radio, and acoustic channels, and discuss each one’s countermeasures and feasibility.
So, built on the idea to duplicate the human vision ability, a computer vision system uses electronic
parts and algorithms instead eyes and brain. The Open Source Computer Vision Library (OpenCV) is the most used library in robotics to detect, track and understand the surrounding world captured by image sensors.
Find Objects with a Webcam (http://introlab.github.io/find-object/) – this tutorial hows you how to detect and track any object captured by the camera using a simple webcam mounted on a robot (or a drone for this purpose) and the Simple Qt interface based on OpenCV.
For image tracking we find first where the LED is. The LED is on the NAS (or in the
keyboard, monitor, etc.), we then extract the blinking light to interpret binary and we extract a binary string from there.
Remember our DS207 NAS isolated from internet? Well, once we infect it with our malware (this article doesn’t cover infection techniques or social hacking), it will be ready to start leaking information. DS207 NAS has a lot of controllable LEDs: Status, LAN,HDD1, HDD2, USB Copy, Power and two buttons – Power and Reset.
Most of the LEDs are controlled by DSM, only the LAN LED is controlled directly by Ethernet chip. HDD LEDs are controlled with IOCTL call to /dev/synobios with SYNOIO_SET_DISK_LED. It is possible to switch these LEDs between OFF/GREEN/GREEN_BLINK/ORANGE/ORANGE_BLINK modes.
List of the available commands:
UART2_CMD_LED_POWER_ON 0x34 Power LED on
UART2_CMD_LED_POWER_BLINK 0x35 Power LED blink
UART2_CMD_LED_POWER_OFF 0x36 Power LED off
UART2_CMD_LED_HD_OFF 0x37 Status LED off
UART2_CMD_LED_HD_GS 0x38 Status LED green
UART2_CMD_LED_HD_GB 0x39 Status LED green blinking
UART2_CMD_LED_HD_AS 0x3A Status LED orange
UART2_CMD_LED_HD_AB 0x3B Status LED orange blinking
In order to turn LEDs OFF:
turn-leds-off.sh
#!/bin/sh
printf \\x36 > /dev/ttyS1 # UART2_CMD_LED_POWER_OFF
printf \\x37 > /dev/ttyS1 # UART2_CMD_LED_HD_OFF
printf \\x42 > /dev/ttyS1 # UART2_CMD_LED_USB_OFF
printf \\x4B > /dev/ttyS1 # UART2_CMD_LED_10G_LAN_OFF
printf \\x50 > /dev/ttyS1 # UART2_CMD_LED_MIRROR_OFF
In order to turn LEDs ON:
#!/bin/sh
printf \\x34 > /dev/ttyS1 # UART2_CMD_LED_POWER_ON
printf \\x38 > /dev/ttyS1 # UART2_CMD_LED_HD_GS
printf \\x40 > /dev/ttyS1 # UART2_CMD_LED_USB_ON
printf \\x4A > /dev/ttyS1 # UART2_CMD_LED_10G_LAN_ON
printf \\x51 > /dev/ttyS1 # UART2_CMD_LED_MIRROR_GS
Coding and decoding LED signals
First of all, a written text is converted to Morse code by a string extension, and finally, the generated Morse code is used to control the LED and audio part. Check the code snippet below:
static class StringToMorse
{
//extension to string
public static string GetMorseCode(this string str)
{
string morse="";
foreach (char ch in str)
{
if (ch == 'a' || ch == 'A')
{
morse += ".- ";
}
else if (ch == 'b' || ch == 'B')
{
morse += "-... ";
}
else if (ch == 'c' || ch == 'C')
{
morse += "-.-. ";
}
// All alphabets not included
// It'd have made article unnecessarily big..
}
}
Now, once the Morse code is generated, the program calls a function asynchronously in a different thread to make the LED flash the Morse without hanging the application. I'm using inpout32.dll to control the parallel port. You can find the complete details about importing and using this DLL in the article I recommended above. Below is a code snippet that uses the generated Morse code to flash the LED:
private void stringToLed(string str)//generated morse code is argument
{
foreach (char ch in str)
{
int mul_fac = Convert.ToInt16(comboBox1.Text);
richTextBox1.Text += ch;
int sleep = Convert.ToInt16(some value);//pause between dot and dash
if (ch == '.')
{
PortInterop.Output(888, 255); // set all data pins to 1
System.Threading.Thread.Sleep(on time of dot);
PortInterop.Output(888, 0);
System.Threading.Thread.Sleep(sleep);
}
else if (ch == '-')
{
PortInterop.Output(888, 255);
System.Threading.Thread.Sleep(on time for dash);
PortInterop.Output(888, 0);
System.Threading.Thread.Sleep(sleep);
}
else if (ch == '/')
{
PortInterop.Output(888, 0);// set all data pins to 0
System.Threading.Thread.Sleep(character pause);
}
else if (ch == ' ')
{
PortInterop.Output(888, 0);
System.Threading.Thread.Sleep(word pause);
}
}
}
Webcam and image processing...
To add more fun, I added another feature of decoding this Morse code. The program watches the on/off sequence of the LED and converts it into English!
Earlier, I was thinking of processing the whole webcam frame and finding the on/ off state of the LED, but this technique made the application work too slow that it couldn't even differentiate between a dot and a dash. So, I made an assumption that the camera source will be stationary, and the user will have to define the light source by a mouse click within the webcam window (see the image below: the point of interception of the two yellow lines is the marker that defines the light source).
Once the light source is defined, the program can go through the pixels near the defined light source and calculate the average brightness of each pixel.
using System.Drawing;
Color c = someBitmap.GetPixel(x,y);
float b = c.GetBrightness();
Wow, that's easy! This code was simple to write, and easy to understand. However, unfortunately, it is very slow. If you use this code, it might take several milliseconds to process, because the GetPixel()/SetPixel() methods are too slow for iterating through bitmaps. So, in this project, we'll make use of the BitmapData class in GDI+ to access the information we want. BitmapData only allows us to access the data it stores through a pointer. This means that we'll have to use the unsafe keyword to scope the block of code that accesses the data. Based on an article by Eric Gunnerson, here's a class that will perform a very quick unsafe image processing:
using System;
using System.Collections.Generic;
using System.Linq;
using System.Windows.Forms;
using System.Drawing;
using System.Drawing.Imaging;
public unsafe class UnsafeBitmap
{
Bitmap bitmap;
int width;
BitmapData bitmapData = null;
Byte* pBase = null;
public UnsafeBitmap(Bitmap bitmap)
{
this.bitmap = new Bitmap(bitmap);
}
public UnsafeBitmap(int width, int height)
{
this.bitmap = new Bitmap(width, height, PixelFormat.Format24bppRgb);
}
public void Dispose()
{
bitmap.Dispose();
}
public Bitmap Bitmap
{
get
{
return (bitmap);
}
}
public struct PixelData
{
public byte blue;
public byte green;
public byte red;
}
private Point PixelSize
{
get
{
GraphicsUnit unit = GraphicsUnit.Pixel;
RectangleF bounds = bitmap.GetBounds(ref unit);
return new Point((int)bounds.Width, (int)bounds.Height);
}
}
public void LockBitmap()
{
GraphicsUnit unit = GraphicsUnit.Pixel;
RectangleF boundsF = bitmap.GetBounds(ref unit);
Rectangle bounds = new Rectangle((int)boundsF.X, (int)boundsF.Y,(int)boundsF.Width, (int)boundsF.Height);
width = (int)boundsF.Width * sizeof(PixelData);
if (width % 4 != 0)
{
width = 4 * (width / 4 + 1);
}
bitmapData = bitmap.LockBits(bounds, ImageLockMode.ReadWrite,
PixelFormat.Format24bppRgb);
pBase = (Byte*)bitmapData.Scan0.ToPointer();
}
public PixelData GetPixel(int x, int y)
{
PixelData returnValue = *PixelAt(x, y);
return returnValue;
}
public void SetPixel(int x, int y, PixelData colour)
{
PixelData* pixel = PixelAt(x, y);
*pixel = colour;
}
public void UnlockBitmap()
{
bitmap.UnlockBits(bitmapData);
bitmapData = null;
pBase = null;
}
public PixelData* PixelAt(int x, int y)
{
return (PixelData*)(pBase + y * width + x * sizeof(PixelData));
}
}
Be sure to check Eric's article on unsafe image processing. This class can be used for retrieving the red, green, and blue values of any pixel, as shown below:
private void GetBritnessOnce(ref Bitmap image)
{
// This code is for getting brightness only once !!
// pt is point defining light source
Rectangle rect = new Rectangle(pt.X - 3, pt.Y - 3, 6, 6);
//cropping image within boundaries of this rectangle
Bitmap img = image.Clone(rect, System.Drawing.Imaging.PixelFormat.Format24bppRgb);
UnsafeBitmap uBitmap = new UnsafeBitmap(img);//unsafe bitmap class
uBitmap.LockBitmap();
float avgBritness = 0;
for (int x = 0; x < 6; x++)
{
for (int y = 0; y < 6; y++)
{
byte red, green, blue;
red = uBitmap.GetPixel(x, y).red;
green = uBitmap.GetPixel(x, y).green;
blue = uBitmap.GetPixel(x, y).blue;
avgBritness += (299 * red + 587 * green + 114 * blue) / 1000;
// brightness function
}
}
avgBritness /= 36 ;
uBitmap.UnlockBitmap();
label19.Text = Convert.ToString(avgBritness);
}
With the brightness value, the program can find whether the light source is "on" or "off", and with a stopwatch, the timings of on/off sequences could be calculated.
The program provides all the stats below the webcam view, and with these stats, it also predicts the Morse code! Make sure to watch the video above.
Here, "dot" defines the time span for which the LED will remain on for every dot within the Morse code, and "DMF",by default, is 3, which means the time span for every dash in the Morse code will be "dot" * 3.
Let's suppose we need to define " ._ " by flashing LEDs. How will we do that?
LED on for "LESS time" --> LED off for "SOME time" --> LED on for "MORE time"
This LED off for "SOME time" is what "Imm" is in the above settings.
Now, let's come to the settings for the decoding part. I'll soon add some AI so that the program will adapt itself after collecting some on/off data.
For brightness less than the "Brightness Threshold", the light source will be considered "off". For best results, keep this setting only a little less than the brightness of the light source in "on" state. Similarly, you can play with other settings to get the best results. The program will provide all the statistics below the webcam window.
Drone Hack (Defensive)
The global market for commercial drones is projected to reach US$1.8 billion by 2020, driven by the expanding use of unmanned aerial vehicles (UAVs) in executing high-risk tasks and the growing prominence of drones-as-a-service (DaaS). Growing demand for superior aerial imagery, remote sensing, air surveillance, development of advanced sensors, improvements on computing speed, and enhanced data processing capabilities, are driving the use of UAVs in commercial applications. Technology maturity and falling prices of these systems are expanding market opportunities
into a wide range of commercial applications like:
● Precision agriculture
● Construction and Inspection
● Public safety and FRO (First Responder Operations)
● Mapping and Surveying
This is a guide on defense, specifically the Parrot Bebop Drone – once pulled out of the box, it has no encryption or authentication methods, thus it leaves the drone susceptible to wireless hacking. Remember, if the drone is updated then certain security functions may be changed.
In this guide, I will be disconnecting the original user from the drone. This can allow any other device to connect to the drone and control it. Additionally, I will be connecting to the drone through Kali Linux, and downloading video captured by the drone. Then, I will demonstrate how to upload files on top of drone files, before connecting over telnet and forcing the drone to shut down and drop from the sky.
FreeFlight Pro now enables you to fly Parrot Bebop drones, Parrot Bebop 2 and Parrot Disco
We need to execute these commands:
Starts a capture file:
(note: -w in the previous command is optional as it is not necessary to write the capture to a file)
To deauthenticate the target permanently:
Now connect to your target with your phone to control the drone.
Original user:
Us:
Now I have the drone control. At this point, I can proceed with the FTP procedure. These steps are to get network services backup, and are not required as long as you have not placed your card into monitor mode.
Nothing with netdiscover.
Now we run a scan on the target… and FTP is up! There is no more Telnet, there also seems to be a web page.
Let’s connect to the FTP server.
“ls” to list files.
“cd” [directory name] to enter a file. As usual, I am going straight for the media file.
These are all videos or photos on the drone.
Alternatively, you could upload infected files, or download files, infect them and reload them to the drone. For the purposes of this article, I will only overwrite the first file and wait for a response.
Done, we now have a modified file and “probably” an infected file on the drone’s user.
Let us see how to hack a password protected drone. This is the network settings page for the drone, notice the simple password.
For added security, users should also change the network name of their devices to avoid targeted attacks. OK, let’s do it.
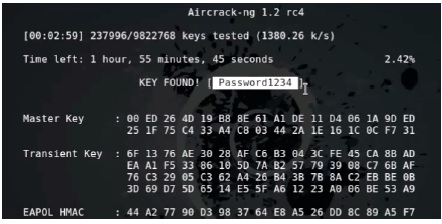
We wait for the password.
The password was found in three minutes. The only way to avoid this is to use complex passwords.
Drone Hack (Offensive)
A FEW HOURS after dark one evening earlier this month, a small quadcopter drone lifted off from the parking lot of Ben-Gurion University in Beersheba, Israel. It soon trained its built-in camera on its target: a desktop computer’s tiny blinking light inside a third-floor office nearby. The pinpoint flickers, emitting from the LED hard drive indicator that lights up intermittently on practically every modern Windows machine, would hardly arouse the suspicions of anyone working in the office after hours. But in fact, that LED was silently winking out an optical stream of the computer’s secrets to the camera floating outside.
That data-stealing drone works as a Mr. Robot-style demonstration of a very real espionage technique. A group of researchers at Ben-Gurion’s cybersecurity lab has devised a method to defeat the security protection known as an “air gap,” the safeguard of separating highly sensitive computer systems from the internet to quarantine them from hackers. If an attacker can plant malware on one of those systems—say, by paying an insider to infect it via USB or SD card—this approach offers a new way to rapidly pull secrets out of that isolated machine. Every blink of its hard drive LED indicator can spill sensitive information to any spy with a line of sight to the target computer, whether from a
drone outside the window or a telescopic lens from the next roof over.
An air gap, in computer security, is sometimes seen as an impenetrable defense. Hackers can’t compromise a computer that’s not connected to the internet or other internet-connected machines, the logic goes. But malware like Stuxnet and the Agent.btz worm that infected American military systems a decade ago have proven that air gaps can’t entirely keep motivated hackers out of ultra-secret systems—even isolated systems need code updates and new data, opening them to attackers with physical access. And once an air-gapped system is infected, researchers have demonstrated a grab bag of methods for extracting information from them despite their lack of an internet connection, from electromagnetic emanations to acoustic and heat signaling techniques—many developed by the same Ben-Gurion researchers who generated the new LED-spying trick.
A drone is navigated to a line-of-sight with the infected computer. The transmitting computer is located. Malware exfiltrate data via hard-drive LED signals.
An air-gapped computer:
● No internet
● No network
● No Wi-Fi / Bluetooth
● No speakers
Software (Malware):
● Transmitting data via electromagnetic signals
● Transmitting data via LED signals
A hard drive activity light is a small LED light that illuminates whenever the hard drive or other built-in storage is being read from or written to.
A hard drive activity light is sometimes referred to as an HDD LED, a hard drive light, or a hard drive activity indicator.
Hard Drive Light Keeps Flashing On and Off...
The goal of this article is not just to inform the curious, but also to provide a starting point for discussions about better algorithms, improvement to the present algorithms, extension of the algorithms to non-machine-sent code, better crypting and decrypting methods, etc.
Let us suppose the next scenario:
A drone is navigated to a line-of-sight with the infected computer. After the computer is located, malware exfiltrate data via HD LED signals until we get 100% of our information target.
Air-gapped networks are isolated, separated both logically and physically from public networks, for example, military,industrial and financial networks. Although the feasibility of invading such systems has been demonstrated in recent years, communication of data to/from air-gapped networks is a challenging task to attackers to perpetrate, an even more difficult threat to defend against.
New methods of communicating with air gapped networks are currently being exposed, some advanced and difficult to mitigate. These newfound vulnerabilities have wide reaching implications on what we considered to be a foolproof solution to network security – the placement of a physical air gap.
But it doesn’t stop there – new techniques of covertly getting information in and out of air gapped networks are being exposed. Thus it is important not only to publicize these vectors of attack, but their countermeasures and feasibility as well.
In this article, we will outline the steps an attacker must take in order to bridge an air gapped network. We will review the state-of-the-art techniques over thermal, radio, and acoustic channels, and discuss each one’s countermeasures and feasibility.
So, built on the idea to duplicate the human vision ability, a computer vision system uses electronic
parts and algorithms instead eyes and brain. The Open Source Computer Vision Library (OpenCV) is the most used library in robotics to detect, track and understand the surrounding world captured by image sensors.
Find Objects with a Webcam (http://introlab.github.io/find-object/) – this tutorial hows you how to detect and track any object captured by the camera using a simple webcam mounted on a robot (or a drone for this purpose) and the Simple Qt interface based on OpenCV.
For image tracking we find first where the LED is. The LED is on the NAS (or in the
keyboard, monitor, etc.), we then extract the blinking light to interpret binary and we extract a binary string from there.
Remember our DS207 NAS isolated from internet? Well, once we infect it with our malware (this article doesn’t cover infection techniques or social hacking), it will be ready to start leaking information. DS207 NAS has a lot of controllable LEDs: Status, LAN,HDD1, HDD2, USB Copy, Power and two buttons – Power and Reset.
Most of the LEDs are controlled by DSM, only the LAN LED is controlled directly by Ethernet chip. HDD LEDs are controlled with IOCTL call to /dev/synobios with SYNOIO_SET_DISK_LED. It is possible to switch these LEDs between OFF/GREEN/GREEN_BLINK/ORANGE/ORANGE_BLINK modes.
List of the available commands:
UART2_CMD_LED_POWER_ON 0x34 Power LED on
UART2_CMD_LED_POWER_BLINK 0x35 Power LED blink
UART2_CMD_LED_POWER_OFF 0x36 Power LED off
UART2_CMD_LED_HD_OFF 0x37 Status LED off
UART2_CMD_LED_HD_GS 0x38 Status LED green
UART2_CMD_LED_HD_GB 0x39 Status LED green blinking
UART2_CMD_LED_HD_AS 0x3A Status LED orange
UART2_CMD_LED_HD_AB 0x3B Status LED orange blinking
In order to turn LEDs OFF:
turn-leds-off.sh
#!/bin/sh
printf \\x36 > /dev/ttyS1 # UART2_CMD_LED_POWER_OFF
printf \\x37 > /dev/ttyS1 # UART2_CMD_LED_HD_OFF
printf \\x42 > /dev/ttyS1 # UART2_CMD_LED_USB_OFF
printf \\x4B > /dev/ttyS1 # UART2_CMD_LED_10G_LAN_OFF
printf \\x50 > /dev/ttyS1 # UART2_CMD_LED_MIRROR_OFF
In order to turn LEDs ON:
#!/bin/sh
printf \\x34 > /dev/ttyS1 # UART2_CMD_LED_POWER_ON
printf \\x38 > /dev/ttyS1 # UART2_CMD_LED_HD_GS
printf \\x40 > /dev/ttyS1 # UART2_CMD_LED_USB_ON
printf \\x4A > /dev/ttyS1 # UART2_CMD_LED_10G_LAN_ON
printf \\x51 > /dev/ttyS1 # UART2_CMD_LED_MIRROR_GS
Coding and decoding LED signals
First of all, a written text is converted to Morse code by a string extension, and finally, the generated Morse code is used to control the LED and audio part. Check the code snippet below:
static class StringToMorse
{
//extension to string
public static string GetMorseCode(this string str)
{
string morse="";
foreach (char ch in str)
{
if (ch == 'a' || ch == 'A')
{
morse += ".- ";
}
else if (ch == 'b' || ch == 'B')
{
morse += "-... ";
}
else if (ch == 'c' || ch == 'C')
{
morse += "-.-. ";
}
// All alphabets not included
// It'd have made article unnecessarily big..
}
}
Now, once the Morse code is generated, the program calls a function asynchronously in a different thread to make the LED flash the Morse without hanging the application. I'm using inpout32.dll to control the parallel port. You can find the complete details about importing and using this DLL in the article I recommended above. Below is a code snippet that uses the generated Morse code to flash the LED:
private void stringToLed(string str)//generated morse code is argument
{
foreach (char ch in str)
{
int mul_fac = Convert.ToInt16(comboBox1.Text);
richTextBox1.Text += ch;
int sleep = Convert.ToInt16(some value);//pause between dot and dash
if (ch == '.')
{
PortInterop.Output(888, 255); // set all data pins to 1
System.Threading.Thread.Sleep(on time of dot);
PortInterop.Output(888, 0);
System.Threading.Thread.Sleep(sleep);
}
else if (ch == '-')
{
PortInterop.Output(888, 255);
System.Threading.Thread.Sleep(on time for dash);
PortInterop.Output(888, 0);
System.Threading.Thread.Sleep(sleep);
}
else if (ch == '/')
{
PortInterop.Output(888, 0);// set all data pins to 0
System.Threading.Thread.Sleep(character pause);
}
else if (ch == ' ')
{
PortInterop.Output(888, 0);
System.Threading.Thread.Sleep(word pause);
}
}
}
Webcam and image processing...
To add more fun, I added another feature of decoding this Morse code. The program watches the on/off sequence of the LED and converts it into English!
Earlier, I was thinking of processing the whole webcam frame and finding the on/ off state of the LED, but this technique made the application work too slow that it couldn't even differentiate between a dot and a dash. So, I made an assumption that the camera source will be stationary, and the user will have to define the light source by a mouse click within the webcam window (see the image below: the point of interception of the two yellow lines is the marker that defines the light source).
Once the light source is defined, the program can go through the pixels near the defined light source and calculate the average brightness of each pixel.
using System.Drawing;
Color c = someBitmap.GetPixel(x,y);
float b = c.GetBrightness();
Wow, that's easy! This code was simple to write, and easy to understand. However, unfortunately, it is very slow. If you use this code, it might take several milliseconds to process, because the GetPixel()/SetPixel() methods are too slow for iterating through bitmaps. So, in this project, we'll make use of the BitmapData class in GDI+ to access the information we want. BitmapData only allows us to access the data it stores through a pointer. This means that we'll have to use the unsafe keyword to scope the block of code that accesses the data. Based on an article by Eric Gunnerson, here's a class that will perform a very quick unsafe image processing:
using System;
using System.Collections.Generic;
using System.Linq;
using System.Windows.Forms;
using System.Drawing;
using System.Drawing.Imaging;
public unsafe class UnsafeBitmap
{
Bitmap bitmap;
int width;
BitmapData bitmapData = null;
Byte* pBase = null;
public UnsafeBitmap(Bitmap bitmap)
{
this.bitmap = new Bitmap(bitmap);
}
public UnsafeBitmap(int width, int height)
{
this.bitmap = new Bitmap(width, height, PixelFormat.Format24bppRgb);
}
public void Dispose()
{
bitmap.Dispose();
}
public Bitmap Bitmap
{
get
{
return (bitmap);
}
}
public struct PixelData
{
public byte blue;
public byte green;
public byte red;
}
private Point PixelSize
{
get
{
GraphicsUnit unit = GraphicsUnit.Pixel;
RectangleF bounds = bitmap.GetBounds(ref unit);
return new Point((int)bounds.Width, (int)bounds.Height);
}
}
public void LockBitmap()
{
GraphicsUnit unit = GraphicsUnit.Pixel;
RectangleF boundsF = bitmap.GetBounds(ref unit);
Rectangle bounds = new Rectangle((int)boundsF.X, (int)boundsF.Y,(int)boundsF.Width, (int)boundsF.Height);
width = (int)boundsF.Width * sizeof(PixelData);
if (width % 4 != 0)
{
width = 4 * (width / 4 + 1);
}
bitmapData = bitmap.LockBits(bounds, ImageLockMode.ReadWrite,
PixelFormat.Format24bppRgb);
pBase = (Byte*)bitmapData.Scan0.ToPointer();
}
public PixelData GetPixel(int x, int y)
{
PixelData returnValue = *PixelAt(x, y);
return returnValue;
}
public void SetPixel(int x, int y, PixelData colour)
{
PixelData* pixel = PixelAt(x, y);
*pixel = colour;
}
public void UnlockBitmap()
{
bitmap.UnlockBits(bitmapData);
bitmapData = null;
pBase = null;
}
public PixelData* PixelAt(int x, int y)
{
return (PixelData*)(pBase + y * width + x * sizeof(PixelData));
}
}
Be sure to check Eric's article on unsafe image processing. This class can be used for retrieving the red, green, and blue values of any pixel, as shown below:
private void GetBritnessOnce(ref Bitmap image)
{
// This code is for getting brightness only once !!
// pt is point defining light source
Rectangle rect = new Rectangle(pt.X - 3, pt.Y - 3, 6, 6);
//cropping image within boundaries of this rectangle
Bitmap img = image.Clone(rect, System.Drawing.Imaging.PixelFormat.Format24bppRgb);
UnsafeBitmap uBitmap = new UnsafeBitmap(img);//unsafe bitmap class
uBitmap.LockBitmap();
float avgBritness = 0;
for (int x = 0; x < 6; x++)
{
for (int y = 0; y < 6; y++)
{
byte red, green, blue;
red = uBitmap.GetPixel(x, y).red;
green = uBitmap.GetPixel(x, y).green;
blue = uBitmap.GetPixel(x, y).blue;
avgBritness += (299 * red + 587 * green + 114 * blue) / 1000;
// brightness function
}
}
avgBritness /= 36 ;
uBitmap.UnlockBitmap();
label19.Text = Convert.ToString(avgBritness);
}
With the brightness value, the program can find whether the light source is "on" or "off", and with a stopwatch, the timings of on/off sequences could be calculated.
The program provides all the stats below the webcam view, and with these stats, it also predicts the Morse code! Make sure to watch the video above.
Here, "dot" defines the time span for which the LED will remain on for every dot within the Morse code, and "DMF",by default, is 3, which means the time span for every dash in the Morse code will be "dot" * 3.
Let's suppose we need to define " ._ " by flashing LEDs. How will we do that?
LED on for "LESS time" --> LED off for "SOME time" --> LED on for "MORE time"
This LED off for "SOME time" is what "Imm" is in the above settings.
Now, let's come to the settings for the decoding part. I'll soon add some AI so that the program will adapt itself after collecting some on/off data.
For brightness less than the "Brightness Threshold", the light source will be considered "off". For best results, keep this setting only a little less than the brightness of the light source in "on" state. Similarly, you can play with other settings to get the best results. The program will provide all the statistics below the webcam window.