Configure And Build Your Own Secure Linux Kernel
One of the best ways to get a feeling for the Linux kernel internals and security features is to configure its settings and then compile it. Most GNU/Linux users and administrators use kernels configured and provided by the community (free and open source distributions) or corporate sponsors
(e.g. Red Hat Enterprise Linux, SUSE Linux Enterprise, Canonical Ubuntu).
The goal of the article is to give you an idea of how to configure a kernel with customized and/or fewer features, which will reduce the chances of an attacker breaking into your systems. For that purpose we will be using 32-bit Ubuntu 12.04 LTS (Long Term Support) distribution.
Lab configuration:
* 2-bit Ubuntu 12.04 LTS virtual machine running on:
* VMware Fusion 5.0.1 installed on Mac OS X 10.7.4 (2.66 GHz Intel Core i7 MacBook Pro with 8 GB RAM).
The Stock Kernel (aka Vanilla or Mainline or Linus Linux Kernel)
The stock kernel (aka vanilla or mainline or Linux Linux kernel) is the generic kernel developed and maintained by the kernel.org (The Linux Kernel Archives) repository. Kernel.org developers associated with The Linux Kernel Organization constantly keep adding features to the kernel, including security improvements and patches.
For the purpose of this article, we will recompile the stock kernel. Linus Torvalds began work on Linux in April 1991 and announced it on August 25 1991, in a message to the comp.os.minix Usenet newsgroup. Linus is one of the Linux Kernel Organization board members and the owner of Linux Registered Trademark. In his blog, he explains that his life is glamorous and that these days he usually writes code in the mail reader mostly telling people ‘do it like this rather than actually writing real code
http://torvalds-family.blogspot.ca/2011/02/pearls-before-swine.html
Linus Explains Linux Trademark Issues:
http://slashdot.org/story/00/01/19/0828245/linus-explains-linux-trademark-issues
https://lkml.org/lkml/2005/8/20/95
The current maintainers of the -stable branch of the Linux kernel are Greg Kroah-Hartman and Chris Wright. Kernels that are close to release but not yet ready are called Release Candidate and have -rc suffix.
Kernel Version Numbering
The Linux kernel has gone through three numbering systems. Linus announced the most recent one on May 29, 2011, when he moved it from the release 2.6.39 to version 3.0, to celebrate the 20th anniversary of Linux. The new system uses time-based release practice by incrementing the second number every 6-7 weeks when new features are introduced to the kernel, while the -stable team can use the third number for their versioning, for example to designate security and bug fixes.
Distribution-Specific Kernels
Distribution developers customize their Linux kernel to include security and other updates. They thoroughly test them and regularly release updated kernel versions. This makes job of Linux server administrators, especially in most enterprise environments, easier because kernel has already been tested and approved. Consequently, that is the preferred method of keeping your production system kernels updated. However, if you want to customize the kernel, for example, to further change its security features, you can recompile it by starting with either a distribution-provided kernel or with the stock Linux kernel.
To print currently loaded kernel release and version, use the uname command with -r and -v options: Listing 1.
Listing 1. Print the currently loaded kernel release and version
uname -r
3.2.0-31-generic-pae
uname -v
#50-Ubuntu SMP Fri Sep 7 16:39:45 UTC 2012
To get more details about the current kernel, use the apt-cache command: Listing 2.
Listing 2. Obtain information about the current kernel
apt-cache search 3.2.0-31-generic-pae | grep image
linux-image-3.2.0-31-generic-pae - Linux kernel image for version 3.2.0 on 32 bit x86 SMP
apt-cache show linux-image-3.2.0-31-generic-pae
Package: linux-image-3.2.0-31-generic-pae
Priority: optional
Section: kernel
Installed-Size: 110438
Maintainer: Ubuntu Kernel Team <kernel-team@lists.ubuntu.com>
Architecture: i386
Source: linux
Version: 3.2.0-31.50
------.
Description-en: Linux kernel image for version 3.2.0 on 32 bit x86 SMP
This package contains the Linux kernel image for version 3.2.0 on 32 bit x86 SMP.
Geared toward 32 bit desktop or server systems with more than 4GB RAM.
Origin: Ubuntu
Supported: 5y
In this case, the current kernel is for 32-bit systems with more than 4GB RAM.
Preparation
Since the kernel compilation is a significant project, its recommended not to do it on production systems. Instead, its advisable to always first test it on your developmental/staging systems.
In addition, make sure to make backups of the current and previous kernel configuration. That is, copy all kernel configurations to a safe location: Listing 3.
Listing 3. Backup kernel configurations
ls -lh /usr/src/linux*/.config
-rw-r--r-- 1 root root 144K Apr 10 19:20 /usr/src/linux-headers-3.2.0-23-generic-pae/.config
-rw-r--r-- 1 root root 144K Sep 7 10:53 /usr/src/linux-headers-3.2.0-31-generic-pae/.config
cp /usr/src/linux-headers-3.2.0-23-generic-pae/.config ~/lin-hdr-3.2.0-23.config
cp /usr/src/linux-headers-3.2.0-31-generic-pae/.config ~/lin-hdr-3.2.0-31.config
ls -lh /boot | grep config
-rw-r--r-- 1 root root 144K Apr 10 19:17 config-3.2.0-23-generic-pae
-rw-r--r-- 1 root root 144K Sep 7 10:50 config-3.2.0-31-generic-pae
cp /boot/config-3.2.0-23-generic-pae ~/config-3.2.0-23-generic-pae.backup
cp /boot/config-3.2.0-31-generic-pae ~/config-3.2.0-31-generic-pae.backup
Stock Kernel Security Updates
The Linux Kernel developers communicate via The Linux Kernel Mailing List:
https://lkml.org/
http://www.tux.org/lkml/
This is a high-traffic list with the average of around 400 messages per day so you might choose other sources for Linux kernel related news, including security related updates:
Kernel Coverage at LWN.net (weekly news) http://lwn.net/Kernel/
LinuxSecurity.com – The Community’s Center for Security http://www.linuxsecurity.com/
Distribution-Specific Kernel Security Updates
The command to update packages on Red Hat and Red Hat derived systems is yum update.
yum update includes the latest Linux kernel versions. When updating production systems, system administrators often exclude kernel updates until they test them on test systems first. To ignore kernel updates, use the yum --exclude=kernel-* option: Listing 4.
Listing 4. Exclude kernel updates on Red Hat based systems
yum update --exclude=kernel-*
On Ubuntu and Ubuntu based systems, the command to update packages is
apt-get update
This will download lists of new available packages from all repositories to find out whether any of the packages needs update. To actually upgrade the system, use apt-get upgrade, which will download and install actual packages. Thus, to install all packages, including kernel, run the both apt-get update and apt-get upgrade commands: Listing 5.
Listing 5. Update all packages, including kernel, on Ubuntu based systems
apt-get update && apt-get upgrade
Kernel Development Software
We need to make sure that the system has C language libraries and compilers, kernel header files and related development tools (Listing 6).
Listing 6. Ensure that the system has necessary development software
apt-get install fakeroot kernel-package build-essential ccache libncurses5 libncurses5-dev
Good Practice
After testing it and making sure that new kernel works, you should remove kernel development software from a production system.
Download The Stock Linux Kernel and Verify Its Digital Signature
Visit the Linux Kernel Archive and check which release is the latest: https://kernel.org.
As of time of this writing (September 22, 2012), the latest release is 3.5.4. Download the latest release and the corresponding PGP signature (Listing 7 – 10). Note the “key ID†and download this key from the key servers (Listing 11). At this point you can follow instructions from the Linux kernel releases PGP signatures page: Listing 12.
Listing 7. Download the most recent kernel source
wget http://www.kernel.org/pub/linux/kernel/v3.0/linux-3.5.4.tar.xz
Listing 8. Download the corresponding PGP signature
wget http://www.kernel.org/pub/linux/kernel/v3.0/linux-3.5.4.tar.sign
Listing 9. Decompress the stock kernel source and verify the .tar archive against the signature
unxz linux-3.5.4.tar.xz
gpg --verify linux-3.5.4.tar.sign linux-3.5.4
gpg: linux-3.5.4: read error: Is a directory
gpg: Signature made Fri 14 Sep 2012 03:28:50 PM PDT using RSA key ID 6092693E
gpg: Can’t check signature: public key not found
Listing 10. gpg --verify output when run first time
gpg: Signature made Fri 14 Sep 2012 03:28:50 PM PDT using RSA key ID 6092693E
gpg: Can’t check signature: public key not found
Listing 11. Download the public key from the PGP keyserver in order to verify the signature
gpg --recv-keys 6092693E
gpg: requesting key 6092693E from hkp server keys.gnupg.net
gpg: key 6092693E: public key “Greg Kroah-Hartman (Linux kernel stable release signing key) <greg@kroah.com>†imported
gpg: Total number processed: 1
gpg: imported: 1 (RSA: 1)
gpg --verify linux-3.5.4.tar.sign
gpg: Signature made Fri 14 Sep 2012 03:28:50 PM PDT using RSA key ID 6092693E
gpg: Good signature from “Greg Kroah-Hartman (Linux kernel stable release signing key) <greg@kroah.com>â€
gpg: WARNING: This key is not certified with a trusted signature!
gpg: There is no indication that the signature belongs to the owner.
Primary key fingerprint: 647F 2865 4894 E3BD 4571 99BE 38DB BDC8 6092 693E
Listing 12. Linux kernel releases PGP signatures page (https://kernel.org/signature.html) quote about verifying the owner of the key used to sign the kernel source archive
Notice the WARNING: This key is not certified with a trusted signature! You will now need to verify
that the key used to sign the archive really does belong to the owner (in our example,
Greg Kroah-Hartman). There are several ways you can do this:
1. Use the Kernel.org web of trust (https://kernel.org/signature.html#kernel-org-web-of-trust).
This will require that you first locate the members of kernel.org in your area and sign their keys.
Short of meeting the actual owner of the PGP key in real life, this is your best option to verify
the validity of a PGP key signature.
2. Review the list of signatures on the developer’s key by using “gpg --list-sigsâ€. Email as many
people who have signed the key as possible, preferably at different organizations (or at least
different domains). Ask them to confirm that they have signed the key in question. You should attach
at best marginal trust to the responses you receive in this manner (if you receive any).
Configure and Build the New Kernel
Extract the kernel source to /usr/src directory. In our case, ensure that previously decompressed .xz archive is moved and extracted in /usr/src directory: Listing 13 and Listing 14. Since we will be starting with Ubuntu-specific kernel, we will need to collect the currently loaded kernel configuration from the /boot directory and copy it to the extracted linux directory with the source code for the kernel that we want to compile (Listing 15).
Listing 13. Move and extract the kernel source to /usr/src directory
mv linux-3.5.4.tar /usr/src
cd /usr/src
tar -xf linux-3.5.4.tar
Listing 14. Content of the /usr/src directory after extracting the kernel source
ls -lh
drwxrwxr-x 23 root root 4.0K Sep 14 15:28 linux-3.5.4
drwxr-xr-x 24 root root 4.0K Apr 23 04:37 linux-headers-3.2.0-23
drwxr-xr-x 7 root root 4.0K Apr 23 04:37 linux-headers-3.2.0-23-generic-pae
drwxr-xr-x 24 root root 4.0K Sep 22 15:38 linux-headers-3.2.0-31
drwxr-xr-x 7 root root 4.0K Sep 22 15:38 linux-headers-3.2.0-31-generic-pae
Listing 15. Collect the currently loaded kernel configuration
cd /usr/src/linux-3.5.4
cp -vi /boot/config-`uname -r` .config
`/boot/config-3.2.0-31-generic-pae’ -> `.config’
Note
From this point on almost everything will be done in the directory with the kernel source code, which is, in our case:
/usr/src/linux-3.5.4
Next, use make oldconfig, which uses this previous .config file to answer all questions that it can, only interactively presenting the new features that are not already answered in that file.
Good Practice
Its recommended to always run make oldconfig before building a kernel (Listing 16).
Listing 16. Making oldconfig
/usr/src/linux-3.5.4# make oldconfig
HOSTCC scripts/basic/fixdep
HOSTCC scripts/kconfig/conf.o
SHIPPED scripts/kconfig/zconf.tab.c
SHIPPED scripts/kconfig/zconf.lex.c
SHIPPED scripts/kconfig/zconf.hash.c
HOSTCC scripts/kconfig/zconf.tab.o
HOSTLD scripts/kconfig/conf
scripts/kconfig/conf --oldconfig Kconfig
* Restart config...
* General setup
*
# configuration written to .config
#
This will present you with a series of interactive questions. If you are not sure about some of the options, leave the default values.
It could be useful if you get familiar with the make utility: Listing 17.
Listing 17. Getting familiar with make utility
make help | less
After that, use make menuconfig kernel configuration tool. It’s a menu-driven user-interface, which allows you to choose the features of the Linux kernel that will be compiled (Figure 1).
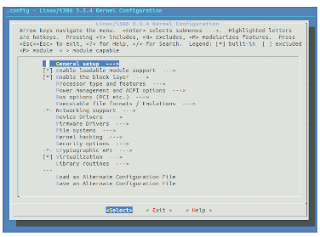

Figure 2. GRUB2 boot menu

make help | less
After that, use make menuconfig kernel configuration tool. It’s a menu-driven user-interface, which allows you to choose the features of the Linux kernel that will be compiled (Figure 1).

Figure 1. Make menu config kernel configuration tool
This is where the real fun begins! You will have to go
through trial and error process until you configure a more secure kernel but as
long as you have system and kernel backups, you are safe to experiment.
Refer to Table 1 for an overview of the options.
General
setup
|
How the
kernel talks to the BIOS, whether to support PCI or PCMCIA, …. Options
whether the system is embedded, kernel compression modes, etc.
Except the “Automatically append version information to the version string†option (see the Tip! box below the table) and, if you would like to enable it, the “Enable access to .config through /proc/config.gz†option, most likely you will not change any options in this section. |
Enable
loadable module support
|
The
default options load appropriate modules as needed. This keeps the basic
kernel small.
|
Processor
type and features
|
Options
regarding the architecture that will be running the kernel.
|
Power
Management and ACPI Options
|
Power
management options related to hibernation and suspend to RAM and standby.
Since during hibernation the content of RAM is written to disk, it could
present a security risk so you might want to disable hibernation in the
kernel.
|
Bus
options (PCI etc.)
|
Support
for PCI cards is typically enabled in this part of the kernel configuration.
If you are not planning to use PCI, PCMCIA cards, you can disable them here.
|
Executable
file formats/emulations
|
Executable
Linkable Format (ELF)
|
Networking
support
|
Extensive
network options, relating to wired and wireless networking, IrDA (infrared),
Bluetooth, WiMAX Wireless Broadband, Amateur Radio, etc. Also includes
options related to the kinds of network packets that the kernel can work
with: DHCP, the Bootstrap Protocol (BOOTP), and the Reverse Address
Resolution Protocol (RARP).
|
Device
Drivers
|
You can
experiment with disabling some of the devices and that way reduce number of
available devices in case of a malicious attack. The list is really big and
some of the devices are: Memory Technology Devices (flash cards, RAM chips,
and similar), SCSI devices support, SATA (Serial ATA) and PATA (Parallel ATA)
drivers, RAID and LVM, Macintosh device drivers, ISDN support, etc.
|
Firmware
Drivers
|
Firmware
drivers support: BIOS, EFI Variable Support via sysfs, iSCSI Boot Firmware
Table Attributes, Google Firmware Drivers.
|
File
systems
|
Enable
or disable ext3, ext4, Reiserfs, FUSE, CD-ROM/DVD Filesystems, DOS/FAT/NT
Filesystems, Pseudo (/proc, sysfs), Network File System (NFS), Quota support.
|
Kernel
hacking
|
Mostly
for kernel developers. Includes advanced kernel debugging options. Not for
production kernels because it adds additional routines, which increases the
kernel size and slows performance.
|
Security
options
|
Enable
or disable and adjust different security models: Security Enhanced Linux
(SELinux), TOMOYO Linux, AppArmor, Yama.
|
Cryptographic
API
|
Support
for cryptography hardware, cryptographic and cipher algorithms.
|
Virtualization
|
Enable
or disable virtualization modules for the Kernel-based Virtual Machine (KVM).
|
Library
routines
|
CRC
functions and decompression support.
|
Tip!
Under the General Setup
menu, navigate to the “Automatically append version
information to the version string option
and enable it. This will add a suffix to the name of the kernel, so that you
can distinguish it from the stock kernel.
After completing the configuration, its time to start
compiling the kernel. If you have multiple CPU cores, you can use the -jN
option, which specifies the number of jobs (commands) to run simultaneously.
Usually you can spawn one or two jobs per core. For example, if you have two
cores, you could run (Listing 18 and Listing 19):
make -j4
Listing 18. Build the kernel
make j2
Listing 19. Output of the make command
SYSHDR
arch/x86/syscalls/../include/generated/asm/unistd_32.h
HOSTCC arch/x86/tools/relocs
Be patient On my system, it took 32 minutes for the
compilation to complete.
The build process will create the file System.map in the
root of the kernel source tree, which is in our case /usr/src/linux-3.5.4. This
file is used during debugging – it contains a symbol lookup table, which maps
kernel symbols to their start addresses.
Install The Kernel
After we built the kernel, we can install it. To set up the
new kernel and initial RAM disk in the /boot directory, and to make necessary changes
to the bootloader (in our case GRUB – the Grand Unified Bootloader): Listing
21 and Listing 22.
Listing 21. Completing the kernel installation
make install
Listing 22. Output of the make install
make install
sh /usr/src/linux-3.5.4/arch/x86/boot/install.sh 3.5.4
arch/x86/boot/bzImage \
System.map “/bootâ€
run-parts: executing /etc/kernel/postinst.d/initramfs-tools
3.5.4 /boot/vmlinuz-3.5.4
update-initramfs: Generating /boot/initrd.img-3.5.4
run-parts: executing /etc/kernel/postinst.d/pm-utils 3.5.4
/boot/vmlinuz-3.5.4
run-parts: executing /etc/kernel/postinst.d/update-notifier
3.5.4 /boot/vmlinuz-3.5.4
run-parts: executing /etc/kernel/postinst.d/zz-update-grub
3.5.4 /boot/vmlinuz-3.5.4
Generating grub.cfg ...
Found linux image: /boot/vmlinuz-3.5.4
Found initrd image: /boot/initrd.img-3.5.4
Found linux image: /boot/vmlinuz-3.2.0-31-generic-pae
Found initrd image: /boot/initrd.img-3.2.0-31-generic-pae
Found linux image: /boot/vmlinuz-3.2.0-23-generic-pae
Found initrd image: /boot/initrd.img-3.2.0-23-generic-pae
Found memtest86+ image: /boot/memtest86+.bin
done
In order to ensure that Linux will have access to modules
that are compatible with the new kernel, install modules by running make
modules_install: Listing 20.
Listing 20. Ensure that the new kernel will have access to
modules
SYSHDR
arch/x86/syscalls/../include/generated/asm/unistd_32.h
HOSTCC arch/x86/tools/relocs
This will install all the compiled modules to /lib/modules.
We are done! Reboot the system and check the new kernel!
Troubleshooting – Restore to Previous Kernel Version
If you are experiencing problems with the new kernel, boot
into the previous kernel. Note that with the new GRUB2, boot menu does not
appear by default. To show the menu, you need to hold down the Shift key in
order to display the menu during boot. In some cases, pressing the Esc key may
also display the menu (Figure 2 and Figure 3).

Figure 2. GRUB2 boot menu

Figure 3. GRUB2 menu Previous Linux
versions option
If you need to permanently change
the boot order, modify the /etc/default/grub file.
For example, if you want to change
the order and revert the default to the third menu entry, which in our case is
‘Ubuntu, with Linux 3.2.0-31-generic-pae’, we would change GRUB_DEFAULT line in the /etc/default/grub file from
GRUB_DEFAULT=0
to
GRUB_DEFAULT=2
Tip!
GRUB2 menu item entries start with 0
so the third menu item is numbered 2.
After changing the /etc/default/grub file, you
have to run update-grub to update /boot/grub/grub.cfg file: Listing 23.
Listing
23. Update grub.cfg after modifying /etc/default/grub file
update-grub
Generating grub.cfg ...
Found linux image: /boot/vmlinuz-3.5.4
Found initrd image: /boot/initrd.img-3.5.4
Found linux image: /boot/vmlinuz-3.2.0-31-generic-pae
Found initrd image: /boot/initrd.img-3.2.0-31-generic-pae
Found linux image: /boot/vmlinuz-3.2.0-23-generic-pae
Found initrd image: /boot/initrd.img-3.2.0-23-generic-pae
Found memtest86+ image: /boot/memtest86+.bin
done
Hardening
the Kernel via the /proc/ Filesystem
In addition to making the kernel
more secure by configuring and compiling it, you can additionally harden it by
using the dynamic kernel options in the /proc/ directory filesystem.
Since the /proc/ directory filesystem is dynamic,
changes will not persist after a reboot. To make permanent changes, you need to
add the necessary options to the
/etc/sysctl.conf file. This file controls sysctl values (sysctl is an interface for modifying
kernel parameters at runtime).
Disable
ICMP Broadcast Echo Activity
To prevent a Smurf attack, configure
your system to not reply to broadcasts by adding the following line in /etc/sysctl.conf:
net.ipv4.icmp_echo_ignore_broadcasts = 1
This doesn’t prevent responses to
targeted ping commands. It only affects broadcasts.
Listing
24. Disable ICMP broadcast echo activity by adding the following line
to /etc/sysctl.conf file
net.ipv4.icmp_echo_ignore_broadcasts = 1
Listing
25. Ignore ICMP spoofed messages by adding the following line to
/etc/sysctl.conf file
net.ipv4.icmp_ignore_bogus_error_responses = 1
Protect
from Bogus ICMP Messages
To ignore ICMP spoofed messages that
do not comply to standards, enable this option:
/proc/sys/net/ipv4/icmp_ignore_bogus_error_responses
Make
the System More Resistant to SYN Floods
In the SYN flood attack, the
targeted machine is flooded with TCP segments requesting connections. These TCP
segments have only the SYN bit set in the TCP header but not the ACK bit. You
can help prevent dropped connections by enabling TCP SYN Cookie. With TCP SYN
Cookie, the kernel does not allocate the TCP buffers unless the server’s
ACK/SYN packet gets an ACK back, confirming that the request was legitimate.
Listing
26. Activate TCP Cookie by adding the following line to
/etc/sysctl.conf file
net.ipv4.tcp_syncookies = 1
Listing
27. Enable Reverse Path Filtering by adding the following two lines
to /etc/sysctl.conf file
net.ipv4.conf.all.rp_filter = 1
net.ipv4.conf.default.rp_filter = 1
Listing
28. Prevent traffic between networks by adding the following three
lines to /etc/sysctl.conf file
net.ipv4.ip_forward = 0
net.ipv4.conf.all.send_redirects = 0
net.ipv4.conf.default.send_redirects = 0
To enable TCP Cookie, enable this
option:
/proc/sys/net/ipv4/tcp_syncookies
Enable
Reverse Path Filtering
To prevent source address spoofing,
enable Reverse Path Filtering. When enabled, it compares packets against the
routing table and drops a packet for which the best route for the source IP
address does not use the same interface that the packet was received on.
To activate reverse path filtering,
enable these options:
/proc/sys/net/ipv4/conf/all/rp_filter
/proc/sys/net/ipv4/conf/default/rp_filter
This will configure RPF for default
and all networks.
Disable
Traffic Between Networks
Most systems are not set up to be routers.
To deactivate a system as a router, configure it via these three options:
/proc/sys/net/ipv4/ip_forward
/proc/sys/net/ipv4/conf/all/send_redirects
/proc/sys/net/ipv4/conf/default/send_redirects
This will disable traffic between
networks for default and all networks.
Prevent
MITM (Man-In-The-Middle) Attacks
Do not accept ICMP redirects
(Listing 29).
Listing
29. Prevent MITM attacks by adding the following line to
/etc/sysctl.conf file
net.ipv4.conf.all.accept_redirects = 0
Prevent
Source Routing
Disabling source routing prevents
network users from specifying the route a packet takes to a destination. This
way you maintain control over how packets are sent (Listing 30).
Listing
30. Disable source routing by adding the following two lines to
/etc/sysctl.conf file
net.ipv4.conf.all.accept_source_route = 0
net.ipv4.conf.default.accept_source_route = 0
This will disable traffic source
routing for default and all networks.
Log
and Drop Martian Packets
Packets with addresses that should
not be possible (for which the host does not have a route back to the source IP
address) are known as Martian packets (Listing 31).
Listing
31. Enable Martian packets logging by adding the following two lines
to /etc/sysctl.conf file
net.ipv4.conf.all.log_martians = 1
net.ipv4.conf.default.log_martians = 1
This will enable Martian packets
logging for default and all networks.
Summary
The developers of major Linux
distributions update kernels on a regular basis. If you want to secure your
kernel even more it’s not such a daunting task to configure it and compile it
by yourself. In addition, for some distributions it takes some time for the
latest kernel updates to be incorporated and to make this waiting period
shorter, you can build your own kernel. By going through this process, you will
get familiar with the kernel internals and learn which of its configuration
settings are related to security. The gained knowledge will help you
tremendously in making your systems and networks more secure.