Configuring Snort as Intrusion Detection System
Introduction
Welcome to the module 3 of this workshop, so far in this workshop, we have been learning about the Snort and its different components and the deployment modes. We have also gone through discussing the Snort architecture. In this module, we will be working to configure Snort as an Intrusion Detection System.
This would be a very quick module to help configure Snort with the easiest and way. However, you need to deep dive into its configuration to enhance your skills further in configuring Snort as per your network requirements.
Pre-requisites
It is strongly recommended that you should first complete the previous two modules before starting this module.
Modes of Snort
Snort operates or runs in the three basic modes (1) packet sniffer mode and (2) Network intrusion detection mode (3) Intrusion Prevention Mode. Packet sniffer mode means it can be used by simply logging the sniffed packets acting as a sniffer. When Snort is applied in the Network Intrusion Detection Mode, it uses pre-configured rules to detect the intrusion.
Details of these modes already covered in previous modules from the overview of explaining what is logging, detecting and preventing functionalities.
Snort operates in two basic modes
Packet sniffer mode and NIDS mode. It can be used as a packet sniffer, like tcpdump or snoop. When sniffing packets, Snort can also log these packets to a log file. The file can be viewed later on using Snort or tcpdump. No intrusion detection activity is done by Snort in this mode of operation. Using Snort for this purpose is not very useful as there are many other tools available for packet logging.
When you use Snort in network intrusion detection (NIDS) mode, it applies its rules to find out if there is any network intrusion detection activity.
In order to achieve Snort configuration, you need to run it in Linux based Operating System, although you can install on multiple operating systems. Operating systems that support Snort are listed below.
Operating System Supports Snort
• Fedora
• CentOS
• FreeBSD
• Windows

To install Snort on Centos or Linux based system, it is recommended to use Source code and compile as per your need. We will demonstrate installation of Fedora Core operating system, and consequently, install and configure Snort as an Intrusion Detection System.
Download and Install Fedora Core Operating System
• Downloading & Installing Virtual Box
• Downloading & Installing Fedora Core
• Downloading & Installing Fedora Core
Downloading & Installing Virtual Box
Download Link: https://www.virtualbox.org/wiki/Downloads.
Select & download the binary, as per your operating system requirement, in our case we will be installing the VirtualBox-4.3.12-93733-OSX from the above download link as shown below.


Installing Fedora Core on Virtual Box
Let’s setup a virtual machine and proceed as shown in the step by step guide. Setup new machine and select operating system type and version as shown below:


Next: select the download image of Fedora Operating System and setup in CDROM as shown below so that you can boot from CDROM and Install operating system.


Next: start the virtual machine and boot from CDROM, to install the Operating System select the option as shown below.
Once installation is completed we will download Snort and install to configure as Intrusion Detection System.
Download and Install Snort
Download snort from snort.org/download page as shown below, you should download source files.

Once download loaded, please follow the steps below to configure and install snort as Intrusion Detection System. By default, the downloaded files would be in the Download folder to move the files into a different directory follow the below steps as shown in the figure.

Now unpack the files as shown below and configure the snort for setting up installation. When we started installing daq, it showed errors as we were not having any c compilers pre-installed, so we resolved this dependency first as shown.


Once installed, you should configure once more and find the following dependencies.
• Libpcap
• Tcmpdum
• Libdnet
• Bison
• Flex
• Tcmpdum
• Libdnet
• Bison
• Flex
Install them one by one as shown in below command and simply replace the program name with the above dependency respectively.
# yum install dependency
Once done with installing dependencies, once more, move to daq folder as shown below and reconfigure and make and make install as shown.


Download and install as shown below. To install this library, you need to install the gcc-c++ compl first. Follow it with command #yum install gcc-c++ and then configure the pcre and then make and make install.

One more dependency which you need to install is the zlib library. Install it with easy installation option #yum install zlib*.
Now, we will start installing the actual core Snort as we are set with all required libraries and dependencies required for Snort.
Installing Snort
When installing snort, it is recommended that you take the clone image of this fedora operating system so that in case something is messed up, you can get the same clean stage of the operating system. This is to release you of the pressure of starting from scratch. Installing snort is now easy. However, you will face errors in opening the virtual Ethernet to capture data Virtual Box. Nevertheless, it should work fine on VMware.
Now install with the following commands.
#./configure
#make
#make install
#make
#make install
do ensure that you are in snort source directory.
Now to run snort as in the mode of intrusion detection you simply need to run it with following parameters.
#snort –vde –c snort.conf
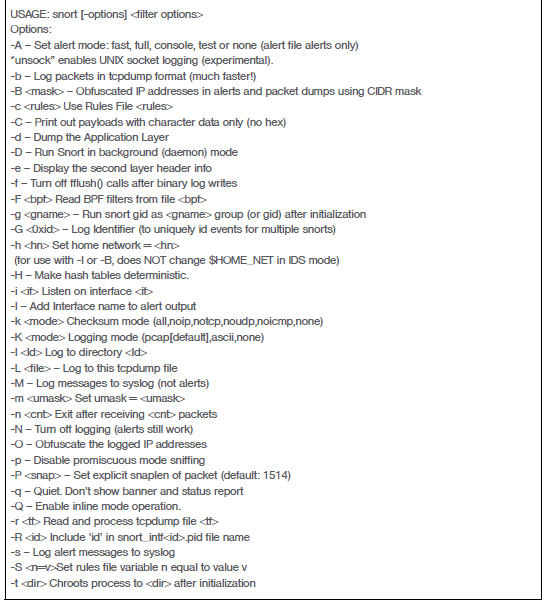
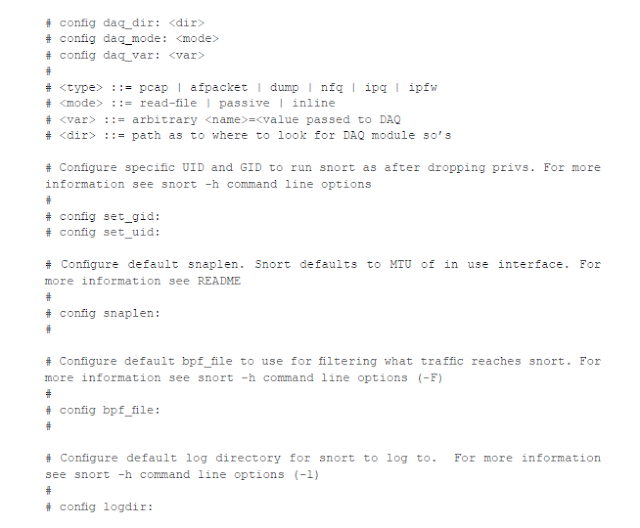
Now we will present the Snort switches which you can use to run install in with different functionality, and we will also present a sample snort configuration file to explain more on snort rules. As you have already been presented with the snort directory structure.


In the upcoming module, we will present the Intrusion Prevention with Snort.
Note
Snort was installed on the virtual machine in this workshop just to present the idea of installation and configuration, it is recommended to install it on a normal machine to avoid errors and smooth detection.
Snort was installed on the virtual machine in this workshop just to present the idea of installation and configuration, it is recommended to install it on a normal machine to avoid errors and smooth detection.