Configuring Snort as an Intrusion Prevention System
Introduction
In this module, we will focus on the Intrusion Prevention part of Snort. This would be a bit short script in comparison with the previous module of this workshop.
Pre-requisites
It is highly recommended that you should first complete the installation of Snort (recommended on the normal machine) and completed the previous modules.
Snort as Intrusion Prevention System (Inline Mode)
Considering the differences between IDS and IPS, the deployment of these two systems is designed according to their role in the network.
Intrusion Detection Systems plays the role of monitoring. They must be able to sniff the traffic that interests them while not compromise the overall network throughput. However, on the other hand, intrusion prevention systems must take immediate action to suspicious packets.
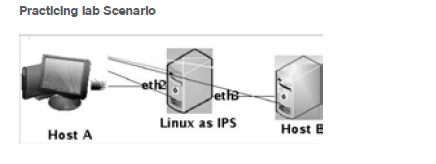
Now, the deployment needs to enable Intrusion Prevention System to look at each packet and dealn with suspicious packet in real-time. Typically making all traffic pass through IPS could achieve the deployment requirement. This is so-called in-line deployment.
IBM has demonstrated the following design for deployment of Snort based intrusion prevention system.

Configure Snort as Intrusion Prevention System (IPS)
Although SNORT is commonly used as an intrusion detection tool, but it has an enhanced capability that could make it act as an Intrusion Prevention System.
Settings to be considered for making Snort as an IPS
• Network Deployment Method
• In-line deployment: The inline deployment enable SNORT to look at each packet and deal with suspicious packet directly
• Advanced Network Configuration with -iptables
• SNORT Mode Configuration should be in-line mode
• SNORT’s rule Actions drop/reject/sdrop
• In-line deployment: The inline deployment enable SNORT to look at each packet and deal with suspicious packet directly
• Advanced Network Configuration with -iptables
• SNORT Mode Configuration should be in-line mode
• SNORT’s rule Actions drop/reject/sdrop
Now configure and run Snort as basic intrusion prevention system as explained.
Change the rules type in the Snort configuration i.e. in the rule file open the http or telnet rule file and change the alert to drop as shown below:
drop tcp any any -> any 23 (msg: “Drop telnet packets”; sid: 1000001)
pass ip any any -> any any
pass ip any any -> any any
Now, edit the configuration file my-snort.conf as follows:
config daq_dir: /usr/lib64/daq
config daq: nfq
config daq_mode: inline
config policy_mode: inline
output alert_full: stdout
include /etc/snort/rules/snort.rules
config daq: nfq
config daq_mode: inline
config policy_mode: inline
output alert_full: stdout
include /etc/snort/rules/snort.rules
Now simply run the snort with the following options as shown below:
$ snort -c /etc/snort/my-snort.conf -Q --alert-before-pass
iptabes configuration
Package filter (iptables) can be configured to pass received package form kernel level to user space where it will be handled by 3rd party application and turned back to kernel level.
In our case 3rd party app is SNORT. As it is configured to work with numbered queue (NFQUEUE) we should route traffic to this queue:
iptables -t nat -A PREROUTING -p tcp --dport 8080 -j NFQUEUE --queue-num 2
Pre-routing explanation
In iptables process model, received package is routed to PREROUTING queue before any routing rules applied. Using Snort on this stage allows us to decide the process locally or redirect somewhere else, e.g. using NAT. The benefit of using numbered queues it that you can create a number of them and pass each of them to individual rule set.
But the disadvantage is that if SNORT fell, the service it protects became unavailable. This happens because there is none to pass data between kernel and user space.